Showing posts with label Easter. Show all posts

Tuesday, March 26, 2013

Berry Apple Salad


I was looking for some salad recipes that were a little different from what I normally have and I found this Berry Apple Salad recipe. It looks good! I think it will be part of my Easter buffet. I saw this recipe on The Red Headed Hostess site . It even has a recipe for the dressing although I think I will just use one of the bottled dressings. Hope you like it!

~~~~~~~~~~~~~~~~~~~~~~~~~~~~~~~~~~~~~~~~~~~~~~~~~
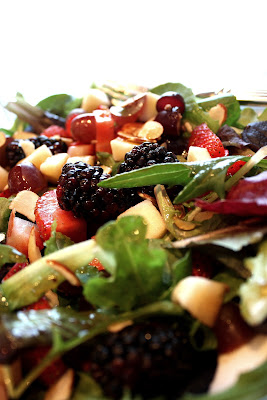
Berry Apple Salad

-  Mixed Salad Greens
- Berries (I have strawberries and blackberries here, but I have used raspberries and blueberries as well)
-  Diced Apples (I LOVE Pink Lady apples in this salad)
- Red Grapes (cut in half – they are much easier to eat that way)
Sugar and Cinnamon Spiced Almonds or crushed honey roasted peanuts
Just prep all of your fruit and layer on top of the greens and drizzle with a poppy seed dressing, or the below dressing.

Balsamic Poppy Seed Dressing

1/2 cup extra light olive oil (or vegetable oil)
1/4 cup balsamic vinegar
1/2 cup sugar
1 T Rice Wine Vinegar
1/4 tsp Worcestershire
1 T Poppy Seeds

Friday, March 22, 2013

Tutorial: Gathered Round Basket

Again, I was looking for tutorials for making something for my grandchildren and found this one. It doesn't look difficult and I have lots of fabric. This tutorial was taken from the A Spoonful of Sugar site and thought "I could do that!". Have fun! Happy Easter!

~~~~~~~~~~~~~~~~~~~~~~~~~~~~~~~~~~~~~~~~~~~~~~~
I had a few requests for instructions on how to make the gathered round 
basket that I made last week. This is an easy project and the baskets can
be made in any size, are fully reversible, and are useful for so many things.


Materials: (to make a basket measuring 4 1/2 inches diameter and
1 3/4 inches high)
  • 2 pieces of cotton fabric cut into circles with a 8 inch diameter 
  • (I 
  • used a small side plate as a template)


    • 1 piece of fusible wadding (such as parlan or pellon) cut into a circle 
    with an 8 inch diameter 

    • strip of fabric measuring 2 1/4 inch x 14 inch (for binding)


    Instructions:
    1. Fuse the wadding to the fabric circle that will form the outside of 

    the basket, following manufacturers directions.

    2. Baste the basket lining and basket outer together with the wrong 

    sides facing.

    3. Using a long straight stitch, sew a gathering stitch around the 

    perimeter of the circle, close to the edge. Stitch a second gathering 
    stitch close to the first gathering stitch. Ensure both gathering stitches
    are within the 1/4 inch seam allowance.


    4. Gently pull the two ends of thread on the wrong side, the fabric 
    will gather along the thread.

    5. Secure the threads at one end to prevent the stitches from pulling out.

    6. Even out the gathers until the circumference of the circle measures approximately 12 inches. When all the gathers are in place, use a 

    standard machine stitch to stitch a 1/4 inch seam.


    7. Press the binding strip in half lengthwise with the wrong sides facing.

    8. Pin the binding to the outside of the basket and stitch in place.


    9. Fold the binding over to the inside of the basket and stitch in place 
    by hand using a slip stitch to secure.


    Edit 07/ 2012 - Just wanted to clarify in response to a few emails - The circles are 8 inches in 
    diameter (the measurement you get if you rule a line through the centre of the circle) and when
     they are gathered they measure 12 inches in circumference (i.e all around the outside of the circle).

    Face Washer Bunny


    I have 11 grandchildren and 10 of them are girls so I was looking for something to give them for Easter. I came along this tutorial on A Spoonful of Sugar site and thought "I could do that!". And maybe you can, too! Below are the instructions from that site. Here goes...


    When my teens were small, I tried to limit their intake of chocolates and sweets. This was always challenging at Easter time. To get around this, the Easter Bunny always left them a book and mini chocolate eggs to hunt for. They used to love getting a special book for Easter - initially they received Peter Rabbit and other books featuring bunnies. Over time it progressed to chapter books. We kept this up all through their primary school years.


    One year, my Grandmother made them little bunnies using Face Washers. She had made one for me when I was a child. If you are after a sweet Easter gift for a baby, a child, a Grandmother, make up an Easter Bunny using a Face washer. They can be teamed with bath toys, or some nice soap and lotion, to make a lovely gift.

    If you would like to make your own bunny you will need:

    • face washer or face cloth measuring approx 33 x 33 cm (13 x 13 inches). (I used a Target Essentials face washer )
    • 2 googly eyes (stitch on variety)
    • 1 hair elastic or rubber band
    • one small pompom (nose)
    • one large pompom (tail)
    • ribbon


    FACE WASHER BUNNY


    Fold the face washer in half diagonally. Starting from the point, roll the face washer into a long roll.


    Fold the roll in half. Fold the pointy ends up towards the rounded part of the roll, and secure with an elastic band (as pictured).

    To make the bunny's face, stitch on the googly eyes and small pompom. Add the larger pompom to the rounded end, and stitch in place. Tie a ribbon around the neck for decoration.

    The bunny can be easily taken apart and used as a face washer.


    Monday, March 26, 2012

    DIY: Chick & Bunny Treat Holders

    I saw this tutorial and thought this would be 
    so nice to do with children for Easter. They are so cute!
    DIY: Chick & Bunny Treat Holders
    This one’s for the kiddies… a fun little craft project + “friendly” holders for all those Easter Bunny treats!
    PAPER BUNNY CUP Treat Holders
    You’ll Need:
    white paper cup
    white cardstock
    pink felt or pink cardstock
    2 wiggle eyes
    small pink pom-pom
    medium white pom-pom (for tail)
    white chenille stems
    scissors, glue, glue dots or a stapler
    Directions
    • From the white cardstock, cut 2 large white ovals for the bunny ears. Trim one side of the oval off so it’s squared off at the bottom.
    • Cut 2 smaller oval shapes from the pink felt (or paper) for the inner part of the ear. Glue the pink ovals in the center of the white ear shapes and set aside to dry.
    • Cut white chenille craft stems into short pieces for the whiskers. Use craft glue or glue dots to attach the whiskers to the cup, then glue the pink pom pom on top for the nose.
    • Attach the ears to the back rim of the cup with a stapler or glue dots.
    • Glue the white pom pom to the back of the cup to create a cotton tail.
    • Fill with a colorful Easter grass and candy treats!
    *****
    PAPER CHICK CUP Treat Holders
    You’ll Need:
    yellow paper cup
    orange cardstock
    orange chenille craft stems
    2 wiggle eyes
    yellow craft feathers
    scissors, glue/glue dots, stapler or tape
    Directions
    • From the orange cardstock, cut a small triangle for the beak and glue it to the front of the cup.
    • Glue the wiggle eyes above the beak.
    • Cut six 3/4-inch pieces of orange chenille stem for the chick feet. Twist three pieces together at one end for each foot. Attach the feet to the front of the cup with glue dots or tacky craft glue.
    • Staple or tape a few feathers to the back edge of the cup, making sure they peek out over the top.
    • Fill with a colorful Easter grass and candy treats!
    Here is the link to the blog that posted it. http://blog.hwtm.com/2009/04/diy-chick-bunny-treat-holders/

    Tuesday, March 20, 2012

    Peep Topiary


    I saw this Peep Topiary on the Hungry Mouse Blog and just thought it was cute and easy! Here is what you need:

    Peep Topiary

    Peep topiary
    1 6-inch pot
    1 7-inch styrofoam ball (for topiary top)
    1 4-5 inch styrofoam chunk (for inside the pot)
    1 12-inch wooden stake or thick wooden dowel
    1 box of wooden toothpicks
    6-7 boxes of marshmallow Peeps
    1 bag of jelly beans
    Other table decorations
    Assorted foil covered chocolate eggs
    Plastic easter eggs
    Easter grass
    Assorted silk flower garlands
    Makes 1 Peep topiary that will knock your socks off


    Easter Egg Garland


    Years ago, my step daughter made me a big egg and left part of it open so she could put in grass and Easter candies. It was so pretty and colorful! I just loved it! Here are some pictures that were on another blog and instructions how to make them. Hope you like them!

    Make a stiffener mixture. I used 1 cup of liquid starch mixed with a half cup of flour. You could double or triple this recipe if you’d like.  I did.
     Next I got some string, I used embroidery floss. You could also use pearl cotton thread or crochet thread.
    Then you stick your string in a bowl of starch goo, but don’t just plop it in there like I first did. Your string WILL get into a knot… and it’s not fun to try and un-snarl gooey string.  So don’t do it. Instead coil your string into the mixture and gently press it into the goo, I didn’t get one knot doing it this way. 
     
    For a little egg, blow up a water balloon and wrap the gooey string around the balloon. Make sure you wipe off the excess goo and let it fall back into the bowl, it doesn’t need to be drippy.
    One skein of embroidery floss was just enough for one water balloon sized egg.
    It’ll take several hours for it to dry. Once it dries, pop the balloon. You might have crusty stuff in-between the string, I scraped that out with a straight pin. 
    But then I decided to thread the eggs onto some more embroidery floss and made a garland out of them. You’ll need a fairly big needle to do this.
    I threaded it  at about 1/4th of the way down from the top of the egg. To keep them in place, I hot glued the eggs to the string. Here is the link of the blog: http://www.craftyendeavor.com/2012/03/08/easter-egg-garland/

    She also made some different size eggs.


    Monday, March 19, 2012

    10 Easter Eggs Decorating Ideas

    Here are some pictures of Easter egg decorating ideas. They did not give a tutorial but look easy to figure out. Anyway, you can look at these pictures and create your own.


    decorative easter eggs
    Photo credit: Wish on a Whisker
    decorative easter eggs
    Photo credit: RafaÅ‚ Wójcik
    decorative easter egg
    Photo credit: DyeDye

    Photo credit: dotcomwomen
    easter egg

    Sunday, March 18, 2012

    Fragrant Fruit Wreath - can you just smell it?

    Turn dried oranges and lemons into a circle of refreshing color. Although this wreath has evergreen and Christmas balls in it, I would replace them with Easter eggs and pastel ribbons to make it for Easter.


    What You'll Need 6-inch round florist's foam wreath 
    • 14 oranges 
    • 8 lemons 
    • Serrated knife 
    • Straight pins 
    • Evergreen sprigs or spring flowers
    • Three small holiday balls or plastic Easter eggs
    • Ribbon 
    How to Make It


    1. Cut oranges and lemons into 1/8-inch-thick slices. Places slices in a 150° F oven on an open rack to dry the slices. Leaves the slices in the oven for 3 hours, turning them over after 90 minutes. (Edges should not be brown.)


    2. When fruit is dry but slightly moist, remove from oven and place on wire rack; air dry for 3 hours. If wreath form has flat edges, use a serrated knife to gently round.


    3. Use straight pins to attach the fruit slices to the wreath, overlapping the pieces to cover the entire foam wreath.


    4. Wire sprigs of greenery together, then secure the bundle to the wreath top. Wire a few holiday balls and ribbon to the greenery.

    Here is the link: http://www.bhg.com/christmas/wreaths/fragrant-fruit-wreath/

    Friday, March 02, 2012

    Bunny Bag Tutorial


    Bunny Bag Tutorial

    This is a great Easter gift that you can make for your children or grandchildren. It's a bunny bag. This is the site that you can go to for the tutorial: http://www.red-brolly.com/red-brolly/2011/03/its-bunny-time.html