Showing posts with label DIY. Show all posts

Friday, January 03, 2014

Eco-Friendly Bath Rugs DIY

I saw this on Pinterest and looks like a great project that would be easy to make. Plus, it is recycling old towels! 

Pinterest referenced the Fine Craft Guild Site and this where I got the directions. If you go to the site, there is also a video showing a mat being made.
-------------------------------------------------------------------------------------------


floor mats


Towel Bath Rugs

Give old towels a second life by knotting them into super-soft, eco-chic
How-to Instructions for Handmade Towel Bath Rugs

1. First, wash and dry the towels you’ll be using for your rug.

2. Decide how big you want your bath rug or rugs to be by measuring the dimensions on the floor, e.g.. in from of your shower recess, as shown here.

3. Purchase gridded matting also called ‘Latch rug canvas‘ and cut it to those dimensions. This usually sits under floor rugs to avoid slipping and is also called ‘rug canvas’ or ‘anti-slip mat’.


I received inquiries as to where to find a base for these rugs. Here is one solution: Blank Latch Rug Canvas With Grid. This rug canvas measures 36”x60” is only $7.50. If you prefer, here is a smaller size: 24 ”x 30 ” rug canvas. Or, just check out the first link here, which gives you a whole range of mats and rug – bases.

4. Cut the towels into strips of approx. 3/4” thick, and then cut the strips into 5-6” long pieces. If you do this, you will need 2-3 old bath towels for a rug sized 18 inches by 2 feet.

5. Knot each strip along the grid, ensuring they all face the same way.

Tip: for a thick, full mat, knot along every line. For a thinner mat, knot along every other line.

It’s an easy to do project that require little concentration. It may take you a while but it will be worth it once you’re finished with your eco-chic bathroom mat.

Budget: nil, and your old towels have a nice new use. bath rugs.


Friday, November 22, 2013

Cute Dolls From Socks

Aren't these dolls cute? I think that they are adorable!I saw these on My Handmade Toys Blog and thought "Now this should be easy!". What do you think? They could be given for Christmas presents or baby shower presents or just to be displayed in your house. Come on, you know you want to try it!


Dolls from socks


It is required to you:

Bright sock
Fabric slice
Scissors
Thread with a needle
Cotton wool or synthetic winterizer for tamping
Small beads or buttons
Pink pencil, ribbons for dressing

 
The sock needs to be cut how it is shown on a picture.

To make a marking for handles and doll legs.


To fill a body of a doll cotton wool or a synthetic winterizer. To stitch handles and legs a seam “forward a needle” on to lines.


To cut out from a fabric a circle. To sheathe its edges a seam “forward a needle”. To fill cotton wool or a synthetic winterizer, to tighten a thread. To sew eyes.

Ready head to sew to a doll body. Of the remained top part of a sock to make a hat. To draw cheeks. The doll is ready.


The child is happy! The group of dolls is filled up:)

Monday, November 18, 2013

Christmas Decorations From Used Plastic Bottles

 I am always looking for recycling ideas from Used items. This is a great one and it is easy. It came from the Cresce bene sight which is Italian. Google has translated it. Anyway, it looks very easy. With a little gliiter and glue, you will become an artist!


Christmas tree decorations


 Chores Christmas for Kids: Christmas tree Needlework children's Christmas: Christmas Tree

Decorate your Christmas tree in 4 easy steps!
Materials
Instructions

A chore fast and nice, to create together with your children to decorate your tree Christmas !

How-to:

1. Retrieve plastic bottles of different colors.

2. Cut the bottom of the bottles and throw everything else.

3. Decorate each piece according to your imagination.

4. Pierce at the top of each piece and insert the colored ribbon.


Sunday, November 17, 2013

Cute Snowmen And So Easy To Make!

I am always looking for do it yourself things that are easy to make and are cute. Well, I just saw these cute snowmen on the Darkroom And Dearly Blog . I am definitely going to try these. The instructions are easy and they only take 10 minutes!

Snock Snowman

For this craft, you'll need a pair of old socks that are crew length, or longer. I went through Tanner's bag o' socks in our closet for my set. Don't worry, he'll never miss them -- he owns something like 10,000 pairs of socks, but insists on wearing shorts and flip-flops 365 days a year. Boys...
First, cut off the top of the sock from the foot.
Turn the sock inside out and attach a rubber band tightly to the top of the sock. Then turn the sock right-side out again.
Fill the sock with rice. Make sure to pack it down as you go so the sock gets a nice round base.
Rubber band the top of the sock closed and put another rubber band 3/4 of the way to the top for the head of your snowman.
Now, decorate! Tie a scarf around your snowman's neck and add eyes, nose, and buttons. I used map pins for my eyes. Unfortunately, I didn't have any black ones, so I colored white ones with sharpie and stuck them in.
Use the toe of your cut socks to fashion a stocking cap. Or you could use colored argyle socks to create hats and sweaters for your snowman, as seen at {then she made}.
You can either sew or glue on your buttons, and add embellishments - twine, bows, ribbons, etc - as needed.

This is such a quick and easy craft - 10 minutes tops - that it would be simple to create a whole family of snowmen for your mantle!

Friday, March 22, 2013

Face Washer Bunny


I have 11 grandchildren and 10 of them are girls so I was looking for something to give them for Easter. I came along this tutorial on A Spoonful of Sugar site and thought "I could do that!". And maybe you can, too! Below are the instructions from that site. Here goes...


When my teens were small, I tried to limit their intake of chocolates and sweets. This was always challenging at Easter time. To get around this, the Easter Bunny always left them a book and mini chocolate eggs to hunt for. They used to love getting a special book for Easter - initially they received Peter Rabbit and other books featuring bunnies. Over time it progressed to chapter books. We kept this up all through their primary school years.


One year, my Grandmother made them little bunnies using Face Washers. She had made one for me when I was a child. If you are after a sweet Easter gift for a baby, a child, a Grandmother, make up an Easter Bunny using a Face washer. They can be teamed with bath toys, or some nice soap and lotion, to make a lovely gift.

If you would like to make your own bunny you will need:

  • face washer or face cloth measuring approx 33 x 33 cm (13 x 13 inches). (I used a Target Essentials face washer )
  • 2 googly eyes (stitch on variety)
  • 1 hair elastic or rubber band
  • one small pompom (nose)
  • one large pompom (tail)
  • ribbon


FACE WASHER BUNNY


Fold the face washer in half diagonally. Starting from the point, roll the face washer into a long roll.


Fold the roll in half. Fold the pointy ends up towards the rounded part of the roll, and secure with an elastic band (as pictured).

To make the bunny's face, stitch on the googly eyes and small pompom. Add the larger pompom to the rounded end, and stitch in place. Tie a ribbon around the neck for decoration.

The bunny can be easily taken apart and used as a face washer.


Tuesday, December 04, 2012

DIY Embroidery Pattern Printing

Hi Everyone! I was on Pinterest and saw this. First thought was I have to share this. What a great idea! When I opened it up, I saw it was from the Homegrown Hospitality Blog . Check it out.

DIY Embroidery Pattern Printing

Thank you for all of your comments and compliments on my "scrapple" style stitching. I love to stitch and while I will be the first to admit that I do not "follow" any rules or techniques on the correct way to stitch I will also say that I LOVE the way it is coming out with all of the textures and stitches and I even added some pink in last night !!?!!whhhaatttt???, I know!


Anyways, I know you can Google "how to transfer an embroidery pattern" but this is how I do it :

Supplies
Muslin
Freezer Paper
Scissors
Iron
Printer

1. Measure and cut a piece of freezer paper to measure 8 1/2" x 11 (just trace a piece of computer paper onto the freezer paper)


2. Place the freezer paper SHINY SIDE OF PAPER DOWN and iron the freezer paper onto the muslin. It will pucker a little bit. MAKE SURE THAT ALL EDGES ARE IRONED DOWN COMPLETELY. Trim to measure the 8 1/2" x 11


3. Place your piece into your printer the way you would typically place paper in and print out your image.


4. Remove the freezer paper


5. Attach an embroidery hoop


6. Stitch away!..be careful..it is addicting, well and even a bit harmful if you poke yourself as much as I do!


Wednesday, October 31, 2012

Ingredient Substitutions

Just in case you are stuck at home because of no electricity, storms, blizzards, or even your car in the shop, these ingredient substitutions are just great to know! All of these were copied from the blog One Good Thing by Jillee. She provides so much good information! And she does it with a little humor, too. I just thought this would be a great way to share her info with my followers plus everything is in one list!
~~~~~~~~~~~~~~~~~~~~~~~~~~~~~~~~~~~~~~~~~~~~~~~~~~

Ingredient Substitutions


Allspice - 1 teaspoon
1/2 teaspoon cinnamon and 1/2 teaspoon ground cloves
Apple cider vinegar (1/4 cup) 1/4 cup white vinegar
Apple pie spice 1 teaspoon
1/2 teaspoon cinnamon, 1/4 teaspoon nutmeg and 1/8 teaspoon cardamom

Balsamic vinegar (1 Tbs.)
1 Tbs. sherry or cider vinegar
Beer (1 cup)
1 cup non-alcoholic beer, beef broth, or apple cider

Baking mix (1 cup)
1 cup pancake mix OR 1 cup Easy Biscuit Mixture


Baking powder 1 teaspoon
1/4 teaspoon baking soda plus 1/2 teaspoon cream of tartar OR 1/4 teaspoon baking soda plus 1/2 cup buttermilk (decrease liquid in recipe by 1/2 cup)


Baking SodaThere is no substitute for baking soda

Barbecue Sauce
Substitute 1 cup ketchup and 1/2 to 1 teaspoon liquid smoke seasoning for 1 cup barbecue sauce.

Bread crumbs 1 cup
1 cup cracker crumbs OR 1 cup matzo meal OR 1 cup ground oats

Broth, beef or chicken 1 cup
1 bouillon cube dissolved in 1 cup boiling water
1 teaspoon powdered broth base dissolved in 1 cup boiling water

Butter (salted) 1 cup
1 cup margarine OR
1 cup shortening plus 1/2 teaspoon salt OR
7/8 cup vegetable oil plus 1/2 teaspoon salt OR
7/8 cup lard plus 1/2 teaspoon salt

Buttermilk 1 cup
1 cup yogurt OR 1 tablespoon lemon juice or vinegar plus enough milk to make 1 cup

Cheddar cheese 1 cup shredded

1 cup shredded Colby cheddar OR 1 cup shredded Monterey Jack cheese

Chicken stock 1 tablespoon base, instant
1 cup canned or homemade chicken dissolved in broth or stock
1 cup water
Chili sauce 1 cup
1 cup tomato sauce, 1/4 cup brown sugar, 2 tablespoons vinegar, 1/4 teaspoon cinnamon, dash of ground cloves and dash of allspice

Chives, finely 2 teaspoons chopped
2 teaspoons finely chopped green onion tops

Chocolate chips 1 ounce semisweet

1 ounce sweet cooking chocolate OR
1 cup chocolate candies OR
1 cup peanut butter OR
other flavored chips OR

Cocoa 1/4 cup
1 (1-ounce) square unsweetened chocolate

Condensed cream of mushroom soup 1 (10.75-ounce) can
1 (10.75-ounce) can condensed cream of celery, cream of chicken, OR golden mushroom soup

Cooking Sprays, No-stick
Substitute for shortening to prepare baking sheets and baking pans.

Corn Syrup 1 cup
1 cup sugar plus 1/4 cup liquid (use whatever liquid is called for in the recipe)
1 cup honey
Cornstarch 1 tablespoon
2 tablespoons all-purpose flour (for thickening)

Cracker crumbs 1 cup
1 cup bread crumbs OR 1 cup matzo meal OR 1 cup ground oats

Cream cheese
Part skim milk ricotta cheese or lowfat cottage cheese beaten until smooth

Cream, half and half (1 cup)

7/8 cup whole milk + 2 Tbs. melted unsalted butterCream, heavy (1 cup) (not for whipping)
2/3 cup whole milk + 1/3 cup melted unsalted butter

Crème fraiche 1 cup
Combine 1 cup of heavy cream and 1 tablespoon of plain yogurt. Let stand for 6 hours at room temperature

Cream, sour 1 cup
3 tablespoons butter plus 7/8 cup sour milk
7/8 cup buttermilk plus 3 tablespoons butter
Cream of tartar 1 teaspoon
2 teaspoons lemon juice or vinegar

Egg 1 whole
Substitute 1/4 cup refrigerated egg product for 1 whole egg.
Espresso Instant Coffee Powder 
Substitute 2 to 3 teaspoons instant coffee granules for 1 tablespoon espresso coffee powder.
Substitute 2 1/2 tablespoons instant cappuccino drink mix for 1 tablespoon espresso coffee powder.

Extracts 1 teaspoon
1/4 teaspoon oil of similar flavor

Flavor-based oil 1/4 teaspoon

1 teaspoon extract of same flavor
Flour, all-purpose (1 cup)
1 cup + 2 Tbs. cake flour

Flour, cake (1 cup)

1 cup minus 2 Tbs. all-purpose flour

Flour, self rising (1 cup) 

1 cup all-purpose flour + 1 1/2 tsp. baking powder + 1/2 tsp. salt

Garlic 1 clove, small
1/8 teaspoon garlic powder or 1/4 teaspoon instant minced garlic
Garlic salt 3/4 teaspoon
1 medium size clove or 1/2 teaspoon minced fresh

Ginger–dry 1 teaspoon

2 teaspoons chopped fresh ginger

Ginger–fresh 1 teaspoon, minced
1/2 teaspoon ground dried ginger

Green onion 1/2 cup chopped

1/2 cup chopped onion, OR
1/2 cup chopped leek OR
1/2 cup chopped shallots

Herbs, dried 1 teaspoon
1 tablespoon fresh, finely cut

Herbs, fresh 1 tablespoon,
1 teaspoon dried herbs

Honey 1 cup
1 1/4 cups sugar plus 1/4 cup liquid (use liquid called for in recipe)
Hot pepper sauce 1 teaspoon
3/4 teaspoon cayenne pepper plus 1 teaspoon vinegar
Italian Seasoning
Substitute 1 teaspoon dried oregano leaves, 1/2 teaspoon dried basil leaves and 1/2 teaspoon dried thyme leaves for 2 teaspoons Italian seasoning.

Ketchup 1 cup
1 cup tomato sauce plus 1 teaspoon vinegar plus 1 tablespoon sugar
Lemon juice (1 Tbs.) 1 Tbs. bottled lemon juice, lime juice or white vinegar

Lemon zest (1 tsp.) 
1 tsp. lime or orange zest or 1/2 tsp. lemon extract chopped

Macaroni
2 cups, (4 cups cooked) uncooked
2 cups spaghetti, uncooked, (2 inch pieces)
4 cups noodles, uncooked

Marshmallows 1 cup
10 large miniature

Marshmallow Creme
Substitute 16 large or 160 miniature marshmallows plus 2 teaspoons light corn syrup for 1 cup marshmallow creme. Place in double boiler or stainless steel bowl over simmering water; stir until smooth.

Mayonnaise 1 cup
1 cup sour cream OR
1 cup plain yogurt

Milk, buttermilk 1 cup
1 cup plain yogurt

Milk, evaporated 1 can (about 12 ounces)
Whip until smooth: 1 cup nonfat dry milk; 1 3/4 cups warm water. Keep refrigerated
Milk, nonfat (1 cup)
1/3 cup powdered milk + 3/4 cup water

Milk, whole (1 cup)
1/2 cup evaporated milk + 1/2 cup water or 1 cup skim milk + 1 Tbs. melted butter

Molasses 1 cup

Mix 3/4 cup brown sugar and 1 teaspoon cream of tartar

Mustard–prepared 1 tablespoon

Mix together 1 tablespoon dried mustard, 1 teaspoon water, 1 teaspoon vinegar and 1 teaspoon sugar

Oil (1 cup)
1 cup melted butter, margarine, or shortening depending on the recipe

Onion 1 small1/4 cup chopped, fresh onion

1-1/3 teaspoons onion salt
1 to 2 tablespoons minced onion
1 teaspoon onion powder

Orange Juice
Substitute 3/4 cup water plus 1/4 cup frozen orange juice concentrate for 1 cup orange juice.

Orange zest (1 tsp.)
1 tsp. lemon or lime zest or 1 tsp. finely chopped candied orange peel

Poultry seasoning (1 tsp.)
1/2 tsp. ground sage + 1/4 tsp. ground thyme + 1/4 tsp. ground rosemary

Pumpkin pie spice (1 tsp.)

1/2 tsp. cinnamon + 1/4 tsp. ginger + 1/8 tsp. nutmeg + 1/8 tsp. cloves-

Shortening (1 cup)
1 cup butter or margarine. Do not substitute oil for shortening.

Sour cream, 1 cup
1 cup plain yogurt OR
1 tablespoon lemon juice or vinegar plus enough cream to make 1 cup OR
3/4 cup buttermilk mixed with 1/3 cup butter

Soy sauce 1/2 cup
4 tablespoons Worcestershire sauce mixed with 1 tablespoon water

Sugar, brown 1 cup, firmly packed
1 cup granular sugar
1 cup granulated sugar plus 1/4 cup molasses
Sugar, white 1 cup
1 cup brown sugar OR
1 1/4 cups confectioners’ sugar OR
3/4 cup honey OR
3/4 cup corn syrup

Tomato juice (1 cup)
1/2 cup tomato sauce + 1/2 cup water

Tomato paste (1/2 cup)
1 cup tomato sauce cooked until reduced by 1/2
Tomato sauce (2 cups)
3/4 cup tomato paste + 1 cup water
Tomatoes, canned (1 cup)
1 1/3 cup fresh cut-up tomatoes; simmered 10 minutes

Vanilla Bean

Substitute 2 to 3 teaspoons vanilla extract for 1 8-inch vanilla bean.
Vanilla extract 
1 teaspoon, 1-inch vanilla bean split and simmered in liquid of recipe

Vegetable Oil
Substitute equal amounts melted butter or margarine for vegetable oil.

White vinegar (1/4 cup)

1/4 cup apple cider vinegar or 1/3 cup lemon juice
Wine, red (1 cup)
1 cup non-alcoholic wine, apple cider, beef broth, tomato juice or water

Wine, white (1 cup)
1 cup non-alcoholic wine, white grape juice, apple juice, chicken broth or water

Worcestershire 1 teaspoon
1 teaspoon bottled steak sauce

Yogurt, plain (1 cup)
1 cup sour cream, buttermilk, or creme fresh or
1 cup heavy whipping cream + 1 Tbs. lemon juice


And as a reward for reading through that extremely LONG list….
here’s a little BONUS.

Commonly used equivalent measures:

• General


3 teaspoons = 1 tablespoon

4 tablespooons = 1/4 cup

5 tablespoons + 1 teaspoon = 1/3 cup

16 tablespoons = 1 cup

2 cups = 1 pint

2 pints = 1 quart

• Butter

1/2 ounce (1/8 stick) = 1 tablespoon

1 ounce (1/4 stick) = 2 tablespoons

2 ounces (1/2 stick) = 4 tablespoons

4 ounces (1 stick) = 1/2 cup

16 ounces (4 sticks) = 2 cups


• Chocolate

12-ounce morsels = 1 cup melted chocolate

12-ounce morsels = 2 cups whole morsels

• Cream

1 cup heavy cream = 2 cups whipped cream

Eggs

8-10 whites, large = 1 cup egg whites
12-14 yolks, large = 1 cup egg yolks
Flour

1 pound = 4 cups

Fruit

1 medium lemon = 3 tablespoons juice + 1 tablespoon grated rind

1 medium orange = 1/3 to 1/2 cup juice + 2 tablespoons grated rind

1 pound apples = 3 medium whole or 3 cups sliced

1 pound bananas = 3 medium whole or 1 1/2 cups mashed

Nutmeats

4 1/2 ounces nuts, chopped = 1 cup

Popcorn
1/4 cup kernels = 8 cups popped

Sugar

1 pound brown sugar = 2 1/4 cups

1 pound confectioners’ = 4 1/2 cups sifted

Tuesday, August 28, 2012

How to Freeze Tomatoes From Your Garden

My neighbor and friends have been giving me a lot of tomatoes from their garden and I was thinking about freezing them. So in my search for an easy way to do it, I came upon this recipe. It looks easy ;-), and looks as if I can do this. So I will try this recipe and let you know how it turns out. Here is the link for the site Pick Your Own . You ought to check it out because it lists places you can pick your own. 

Freezing home grown or farm fresh tomatoes for use in winter cooking is very easy to do! The flavor of spaghetti sauce, lasagna, and salsas you make then will be superior to those made from canned tomatoes or store bought so called "fresh" tomatoes.

Here's how to do it, in easy steps and completely illustrated.   This method is so easy, ANYONE can do this!  It's a great thing to do with your kids!  If you'd rather can your tomatoes, see this page for canning directions for tomatoes!
These pages may also interest you:

Ingredients and Equipment

  • Tomatoes - any quantity, ripe, but not over ripe, still firm.
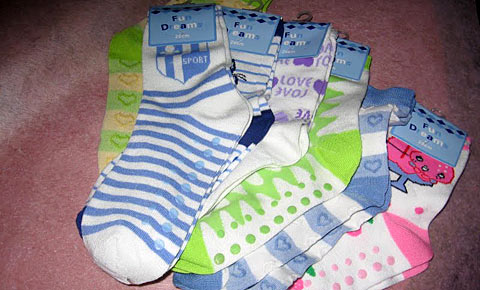
  • Vacuum food sealer or plastic freezer bags
  • 1 large pot
  • Large slotted spoon

Process - How to Make Spaghetti Sauce from Fresh Tomatoes

Step 1 - Selecting the tomatoes

It's fun to go pick your own and you can obviously get better quality tomatoes!  
At right is a picture of tomatoes from my garden - they are so much better than anything from the grocery store. And if you don't have enough, a pick-yo
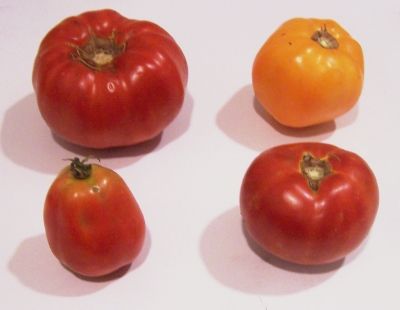
u-own farm is the place to go!  Below are 4 common varieties that will work:
Top left: Beefsteak
Bottom left: Roma, paste-type
Top right: Lemon Boy, yellow
Bottom right: Better Boy

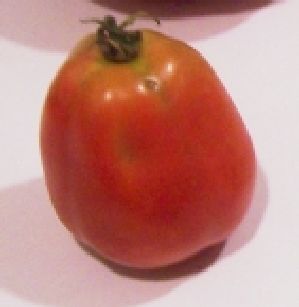
The picture at right shows the best variety of tomato to use: Roma; also called paste tomatoes.  They have fewer sides, thicker, meatier walls, and less water. And that means thicker sauce in less cooking time!
Also, you don't want mushy, bruised or rotten tomatoes!

Step 2 - Removing the tomato skins

Here's a trick you may not know: put the tomatoes, a few at a time in a large pot of boiling water for no more than 1 minute (30 - 45 seconds is usually enough)
then....
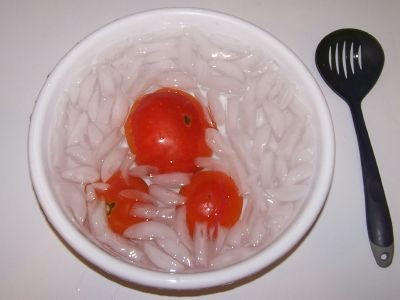
Plunge them into a waiting bowl of ice water.
This makes the skins slide right off of the tomatoes!  If you leave the skins in, they become tough and chewy in the sauce, not very pleasant.


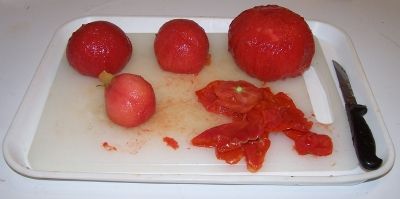
Step 3 -  Removing the skins, bruises and tough parts

The skins should practically slide off the tomatoes.  then you can cut the tomatoes in quarters and remove the tough part around the stem and any bruised or soft parts.
After you have peeled the skins off the tomatoes, cut the tomatoes in half.  Now we need to remove the seeds and excess water. 
Note: why remove the skins? They become tough and discolored in storage.  You wouldn't want to eat them!

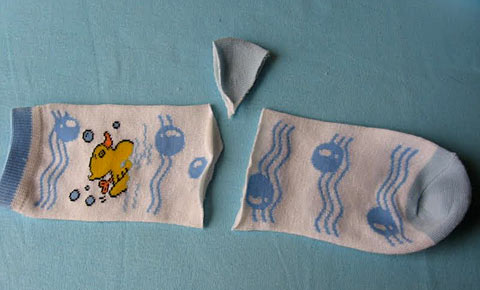
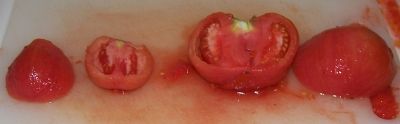
Step 4 - Squeeze of the seeds and water

Just like it sounds: wash your hands then squeeze each tomato and use your finger or a spoon to scoop and shake out most of the seeds.  You don't need to get fanatical about it; removing just most will do. Another way to do it is to cut each tomato in half, across it, instead of lengthwise. Then just shake the seeds and juice out. Here are before and after photos:

Step 5 - Drain the tomatoes

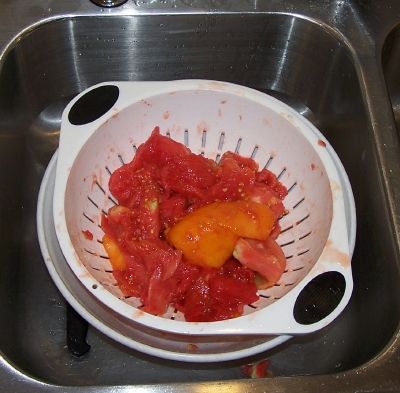
Toss the squeezed (Squozen? :) tomatoes into a colander or drainer, while you work on others. This helps more of the water to drain off.  You may want to save the liquid: if you then pass it through a sieve, screen or cheesecloth, you have fresh tomato juice; great to drink cold or use in cooking! By draining the water off now, you'll end up with a thicker spaghetti sauce in less cooking time! And that preserves vitamins (and your sanity).

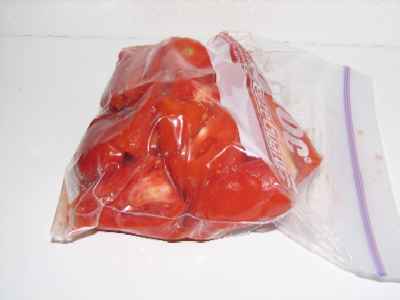
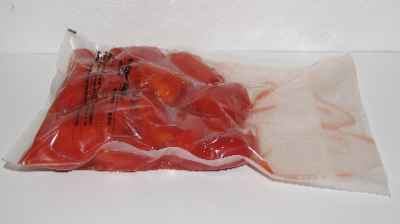
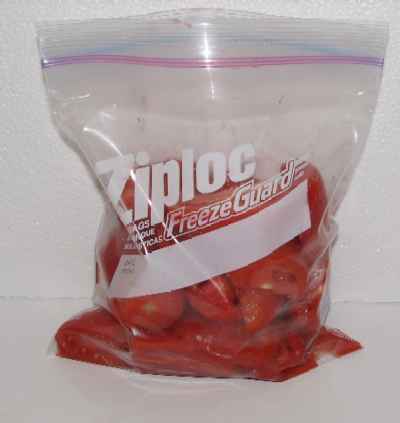
 Step 6 - Fill the freezer bags

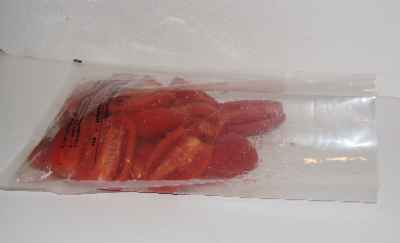
Don't overfill the bags, leave a little room for expansion. Do try to avoid leaving any air pockets!   A vacuum bag is shown at left, but you can use ziploc (or similar) bags, show below.  But be sure to squeeze out the extra air (below left is before, below right is after squeezing out the excess air)

Step 7 - Vacuum seal the bags (if you have a vacuum sealer)

Obviously if you haven't got a vacuum food sealer, just inspect the bags and you may need to open them and reseal them to eliminate any air pockets!
TIP:  If you don't own a vacuum food sealer to freeze foods, place food in a Ziploc bags, zip the top shut but leave enough space to insert the tip of a soda straw. When straw is in place, remove air by sucking the air out.  To remove straw, press straw closed where inserted and finish pressing the bag closed as you remove straw.

Step 8 - Freeze the bags

Pop them into the freezer (on the quick freeze shelf, if you have one).  Now leave them for 2 or 3 hours till frozen.


Put in the back (coldest part) of your freezer
And wait for a cold winter night when it is dark and dreary out, to remove it and defrost (microwave works well) and use in making so fresh tasting spaghetti sauce or other tomato cooking!