Showing posts with label grandchildren. Show all posts

Friday, March 22, 2013

Tutorial: Gathered Round Basket

Again, I was looking for tutorials for making something for my grandchildren and found this one. It doesn't look difficult and I have lots of fabric. This tutorial was taken from the A Spoonful of Sugar site and thought "I could do that!". Have fun! Happy Easter!

~~~~~~~~~~~~~~~~~~~~~~~~~~~~~~~~~~~~~~~~~~~~~~~
I had a few requests for instructions on how to make the gathered round 
basket that I made last week. This is an easy project and the baskets can
be made in any size, are fully reversible, and are useful for so many things.


Materials: (to make a basket measuring 4 1/2 inches diameter and
1 3/4 inches high)
  • 2 pieces of cotton fabric cut into circles with a 8 inch diameter 
  • (I 
  • used a small side plate as a template)


    • 1 piece of fusible wadding (such as parlan or pellon) cut into a circle 
    with an 8 inch diameter 

    • strip of fabric measuring 2 1/4 inch x 14 inch (for binding)


    Instructions:
    1. Fuse the wadding to the fabric circle that will form the outside of 

    the basket, following manufacturers directions.

    2. Baste the basket lining and basket outer together with the wrong 

    sides facing.

    3. Using a long straight stitch, sew a gathering stitch around the 

    perimeter of the circle, close to the edge. Stitch a second gathering 
    stitch close to the first gathering stitch. Ensure both gathering stitches
    are within the 1/4 inch seam allowance.


    4. Gently pull the two ends of thread on the wrong side, the fabric 
    will gather along the thread.

    5. Secure the threads at one end to prevent the stitches from pulling out.

    6. Even out the gathers until the circumference of the circle measures approximately 12 inches. When all the gathers are in place, use a 

    standard machine stitch to stitch a 1/4 inch seam.


    7. Press the binding strip in half lengthwise with the wrong sides facing.

    8. Pin the binding to the outside of the basket and stitch in place.


    9. Fold the binding over to the inside of the basket and stitch in place 
    by hand using a slip stitch to secure.


    Edit 07/ 2012 - Just wanted to clarify in response to a few emails - The circles are 8 inches in 
    diameter (the measurement you get if you rule a line through the centre of the circle) and when
     they are gathered they measure 12 inches in circumference (i.e all around the outside of the circle).

    Face Washer Bunny


    I have 11 grandchildren and 10 of them are girls so I was looking for something to give them for Easter. I came along this tutorial on A Spoonful of Sugar site and thought "I could do that!". And maybe you can, too! Below are the instructions from that site. Here goes...


    When my teens were small, I tried to limit their intake of chocolates and sweets. This was always challenging at Easter time. To get around this, the Easter Bunny always left them a book and mini chocolate eggs to hunt for. They used to love getting a special book for Easter - initially they received Peter Rabbit and other books featuring bunnies. Over time it progressed to chapter books. We kept this up all through their primary school years.


    One year, my Grandmother made them little bunnies using Face Washers. She had made one for me when I was a child. If you are after a sweet Easter gift for a baby, a child, a Grandmother, make up an Easter Bunny using a Face washer. They can be teamed with bath toys, or some nice soap and lotion, to make a lovely gift.

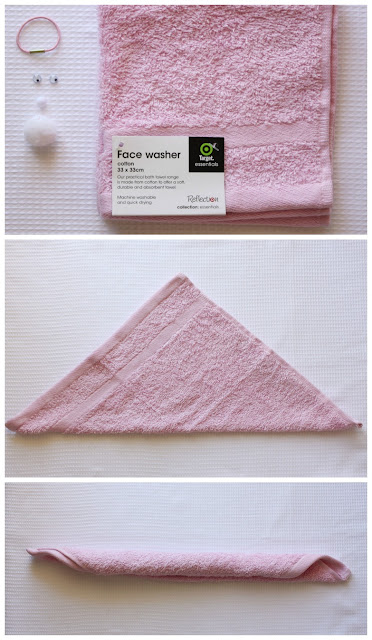
    If you would like to make your own bunny you will need:

    • face washer or face cloth measuring approx 33 x 33 cm (13 x 13 inches). (I used a Target Essentials face washer )
    • 2 googly eyes (stitch on variety)
    • 1 hair elastic or rubber band
    • one small pompom (nose)
    • one large pompom (tail)
    • ribbon


    FACE WASHER BUNNY


    Fold the face washer in half diagonally. Starting from the point, roll the face washer into a long roll.


    Fold the roll in half. Fold the pointy ends up towards the rounded part of the roll, and secure with an elastic band (as pictured).

    To make the bunny's face, stitch on the googly eyes and small pompom. Add the larger pompom to the rounded end, and stitch in place. Tie a ribbon around the neck for decoration.

    The bunny can be easily taken apart and used as a face washer.


    Sunday, January 20, 2013

    New Grandbaby’s Blanket


    This is a baby blanket I made for our new granddaughter, Norah. She was born on 1/14 and is just a cutie!

    Thursday, July 12, 2012

    Guess You Are Wondering What I have been Doing . . . or maybe not . . .

    Guess you all are wondering what happened to me and why I haven't been posting. Well, let me tell you about what's going on.

    First, I must say that I am not a "summer person". Heat does not wear well on me. And it has been hot in Hanover, PA this summer. We have an older motorhome that we go camping with or my husband takes it when drag racing his cars. My husband does complain that we have no one to camp with (sorry about ending a sentence with a preposition). This summer we found people to camp with!

    So in May my daughter bought a new hybrid camper. It looks like this:


    The ends of the camper are the beds. By the way these children are some of our grandchildren except for Jeremy. From left to right: Matthew (only grandson), Jeremy, Olivia, Kierra, Ariana, and Meagan. So now you see the camper and the grandchildren. Anyway, my daughter wanted us to go with them on their first camping trip with their new camper just in case they were unsure how to operate the camper. We went to Round Top Campground in Gettysburg, PA. Here is their link: Round Top Campground.

    So we went with them on Memorial Day Weekend. The campground is very nice. It has a nice pool and activities for the adults and the children. It just so happened that they had some reenactors camping there that weekend. They had an activity that cost $2 where you could have someone arrested by the reenactors. Of course my grandson (who just loves his sisters), wanted to have his sister (Meagan) and Ariana (his step cousin - is that a word?) arrested. The reenactors came to the campsite, with guns, to arrest them. At first the girls did not want to go along with it but they gave in. Olivia was very upset that her sister, Meagan, was arrested. She cried and cried but stayed at the campground with me so she could eat! She eventually calmed down.


    Afterwards, they did admit they had fun. Matthew was snickering the whole time!! He loved it.


    One more thing - it was over 100 degrees at the campground!!! Yes it was hot!! We had taken our two dogs with us - Muffin (a Polish Lowland Sheepdog) and Marcy (a St. Bernard). They did not do well in the heat (nor did I) and we had to take them home Saturday night. The house was air conditioned which made them happy. We made trips home to feed them and let them out. They recovered from the heat and are lively as ever!


    And as for me... it was hot and I sweated profusely! Maybe I should have said "perspired" but all I know there was watering pouring down my face all the time. The heat and humidity did a number on me and everyone else, but . . . it was all worth it to go camping with my daughter, son-in-law, and grandchildren! And of course, my husband ;-).


    Tuesday, April 24, 2012

    Still busy...

    Last year I had bought some ABC panels that I was going to make wall hangings for my granddaughters. Today I got up and decided I would make one for my daughter. She does daycare in her house and this would help the children to learn their ABCs. So I used one panel and put borders on it with bright colors (I like bright colors!), added batting, and fabric for the back. Voila! (that's French), here it is:


    So let me know what you think and any ideas that you have for the next three,

    Tuesday, February 28, 2012

    Fabric Houses Tutorial


    I saw one of these dollhouses on Pinterest and thought it was so cute. I have added the link for the tutorial so you can make them yourself . This would make a nice Easter gift for a child or even a birthday gift. The pictures show some houses or barns that be for a boy or a girl.
    I am planning to try it, too. It looks like so much fun! I may just make them for my granddaughters.

     http://uklassinus.blogspot.com/2008/08/fabric-dollhouse-tutorial.html


    Wednesday, February 23, 2011

    Snow on the ground and thinking Spring - where is it?

    Last week we had some warm weather and then it snowed again. So now I look out the window and see snow on the round but keep thinking of Spring. Looking forward to warm days, flowers sprouting, birds singing, people cutting their grass! I love the smell of cut grass especially in the spring.

    I have started 2 projects. One is a crocheted baby afghan and the other is a baby quilt. I started the afghan using light yellow baby yarn. I plan to add pink and a light green, too. Then I will put a ruffle around it.

    For the quilt, I bought some embroidered quilt blocks on EBay and will sew it together with pink fabric. The quilt blocks are white background and the embroidery is various baby girl blocks. It will look good with the pink fabric around the white blocks. Now I have to get going. The grandbaby is due in May.

    Monday, June 08, 2009

    Looking for an embroidery sewing machine that is right for me

    I have been searching Ebay and the net for embroidery sewing machines. I have went to 2 Bernina stores and one Brother store. Some of them are so expensive. Sometimes I am not even sure I want to get one then I think about the things I could make for the grandchildren, and I want one.