
Friday, March 29, 2013
Tuesday, March 26, 2013
Berry Apple Salad
I was looking for some salad recipes that were a little different from what I normally have and I found this Berry Apple Salad recipe. It looks good! I think it will be part of my Easter buffet. I saw this recipe on The Red Headed Hostess site . It even has a recipe for the dressing although I think I will just use one of the bottled dressings. Hope you like it!
~~~~~~~~~~~~~~~~~~~~~~~~~~~~~~~~~~~~~~~~~~~~~~~~~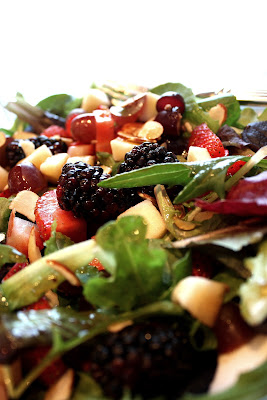
Berry Apple Salad
- Mixed Salad Greens
- Berries (I have strawberries and blackberries here, but I have used raspberries and blueberries as well)
- Diced Apples (I LOVE Pink Lady apples in this salad)
- Red Grapes (cut in half – they are much easier to eat that way)
- Sugar and Cinnamon Spiced Almonds or crushed honey roasted peanuts
Just prep all of your fruit and layer on top of the greens and drizzle with a poppy seed dressing, or the below dressing.
Balsamic Poppy Seed Dressing
1/2 cup extra light olive oil (or vegetable oil)
1/4 cup balsamic vinegar
1/2 cup sugar
1 T Rice Wine Vinegar
1/4 tsp Worcestershire
1 T Poppy Seeds
Monday, March 25, 2013
Orange Sherbet Cake - 3 ingredients
I just love cakes and this one looked so good that I had to try it. I couldn't find the sugar free yellow cake mix at my Walmart so I chose the regular orange cake mix. I used the Diet Orange Soda and the Lite frozen whipped topping. When I put the soda in the cake mix, it really did froth up. This cake was so GOOD!!! You have to try it. It is so refreshing! I saw the recipe on It's On The Tip Of My Tongue Blog so I included what Sarah wrote about this recipe and her pictures. Thanks Sarah!
~~~~~~~~~~~~~~~~~~~~~~~~~~~~~~~~~~~~~~~~~~~~~~~~~~
I’ve seen lots of variations of this recipe, but this is the one I chose. Click on the picture below for the original source. There were many similar recipes. I omitted the eggs in this recipe (because I didn’t have any) and that did not effect the outcome.
I chose sugar free yellow cake mix (made with Splenda and reduced in calories by about 50 calories a slice when compared to the original cake mix), diet Crush, and lite frozen whipped topping.

Measure out 12 ounces of diet soda.

Pour the soda into the cake mix. Whisk for 30 seconds.

Bake according to the directions on the box. Let the cake cool (if you have the patience for that sort of thing). Top with thawed whip cream. Put on a paper plate. What? Ok, fine, I was too excited to try the cake to even be thinking about photographing in a nice way. You can put it on a nice plate if you’re in to that type of thing and don’t have half of the neighborhood kids waiting for this cake to be done.

On a scale of 1-10 on the diet dessert recipes index, this yummy cake earns a 10 from me! A six-year-old neighbor boy even asked me to write the recipe down for his mom because it was the best cake he’d ever had!
Friday, March 22, 2013
Tutorial: Gathered Round Basket
Again, I was looking for tutorials for making something for my grandchildren and found this one. It doesn't look difficult and I have lots of fabric. This tutorial was taken from the A Spoonful of Sugar site and thought "I could do that!". Have fun! Happy Easter!
~~~~~~~~~~~~~~~~~~~~~~~~~~~~~~~~~~~~~~~~~~~~~~~
I had a few requests for instructions on how to make the gathered round
basket that I made last week. This is an easy project and the baskets can
be made in any size, are fully reversible, and are useful for so many things.

Materials: (to make a basket measuring 4 1/2 inches diameter and
1 3/4 inches high)
(I
used a small side plate as a template)

Instructions:
1. Fuse the wadding to the fabric circle that will form the outside of
the basket, following manufacturers directions.
2. Baste the basket lining and basket outer together with the wrong
sides facing.
3. Using a long straight stitch, sew a gathering stitch around the
perimeter of the circle, close to the edge. Stitch a second gathering
stitch close to the first gathering stitch. Ensure both gathering stitches
are within the 1/4 inch seam allowance.

4. Gently pull the two ends of thread on the wrong side, the fabric
will gather along the thread.
5. Secure the threads at one end to prevent the stitches from pulling out.
6. Even out the gathers until the circumference of the circle measures approximately 12 inches. When all the gathers are in place, use a
standard machine stitch to stitch a 1/4 inch seam.

7. Press the binding strip in half lengthwise with the wrong sides facing.
8. Pin the binding to the outside of the basket and stitch in place.

9. Fold the binding over to the inside of the basket and stitch in place
by hand using a slip stitch to secure.


Edit 07/ 2012 - Just wanted to clarify in response to a few emails - The circles are 8 inches in
diameter (the measurement you get if you rule a line through the centre of the circle) and when
they are gathered they measure 12 inches in circumference (i.e all around the outside of the circle).
basket that I made last week. This is an easy project and the baskets can
be made in any size, are fully reversible, and are useful for so many things.

Materials: (to make a basket measuring 4 1/2 inches diameter and
1 3/4 inches high)
- 2 pieces of cotton fabric cut into circles with a 8 inch diameter
- 1 piece of fusible wadding (such as parlan or pellon) cut into a circle
- strip of fabric measuring 2 1/4 inch x 14 inch (for binding)

1. Fuse the wadding to the fabric circle that will form the outside of
the basket, following manufacturers directions.
2. Baste the basket lining and basket outer together with the wrong
sides facing.
3. Using a long straight stitch, sew a gathering stitch around the
perimeter of the circle, close to the edge. Stitch a second gathering
stitch close to the first gathering stitch. Ensure both gathering stitches
are within the 1/4 inch seam allowance.

will gather along the thread.
5. Secure the threads at one end to prevent the stitches from pulling out.
6. Even out the gathers until the circumference of the circle measures approximately 12 inches. When all the gathers are in place, use a
standard machine stitch to stitch a 1/4 inch seam.

8. Pin the binding to the outside of the basket and stitch in place.

by hand using a slip stitch to secure.


Edit 07/ 2012 - Just wanted to clarify in response to a few emails - The circles are 8 inches in
diameter (the measurement you get if you rule a line through the centre of the circle) and when
they are gathered they measure 12 inches in circumference (i.e all around the outside of the circle).
Face Washer Bunny
I have 11 grandchildren and 10 of them are girls so I was looking for something to give them for Easter. I came along this tutorial on A Spoonful of Sugar site and thought "I could do that!". And maybe you can, too! Below are the instructions from that site. Here goes...

When my teens were small, I tried to limit their intake of chocolates and sweets. This was always challenging at Easter time. To get around this, the Easter Bunny always left them a book and mini chocolate eggs to hunt for. They used to love getting a special book for Easter - initially they received Peter Rabbit and other books featuring bunnies. Over time it progressed to chapter books. We kept this up all through their primary school years.

One year, my Grandmother made them little bunnies using Face Washers. She had made one for me when I was a child. If you are after a sweet Easter gift for a baby, a child, a Grandmother, make up an Easter Bunny using a Face washer. They can be teamed with bath toys, or some nice soap and lotion, to make a lovely gift.
If you would like to make your own bunny you will need:
- face washer or face cloth measuring approx 33 x 33 cm (13 x 13 inches). (I used a Target Essentials face washer )
- 2 googly eyes (stitch on variety)
- 1 hair elastic or rubber band
- one small pompom (nose)
- one large pompom (tail)
- ribbon
FACE WASHER BUNNY

Fold the face washer in half diagonally. Starting from the point, roll the face washer into a long roll.

Fold the roll in half. Fold the pointy ends up towards the rounded part of the roll, and secure with an elastic band (as pictured).
To make the bunny's face, stitch on the googly eyes and small pompom. Add the larger pompom to the rounded end, and stitch in place. Tie a ribbon around the neck for decoration.
The bunny can be easily taken apart and used as a face washer.

Subscribe to:
Posts (Atom)