Showing posts with label easy. Show all posts

Friday, January 17, 2014

Salad on a Jar - Delicious!

Well,  I tried this and the salad was just great! I put the salad dressing in the bottom and then added sliced red onions, sunflower kernels (couldn't find just the seeds), sliced grape tomatoes, sliced cucumbers, sliced hard boiled eggs, sliced radishes, and ending with the Spring salad mix (a container that I bought at Walmart) at the top. I used wide mouth quart Ball jars because that is all I could get. I made 4 jars of salad and ate 1 the next day. My Husband also ate 1. Initially, he was not a happy camper about me putting the salad in jars, but after he started eating the salad, he really liked it. 

I got the recipe from the Titan Outlet Store site. Never thought that they would have a recipe on their page. You have to try this! It is really good!

Farm Recipe: Salad in a Jar

Posted on: March 6th, 2013 by titanoutlet No Comments
 Salad in a Jar – Ingenious!
I’ve always loved salads, and especially love the salad bars where you can choose from a wide array of makings.  My biggest problem at home though, is actually putting the salad together once I have all of the fixings.  I don’t know why that is – perhaps my subconscious is telling me that digging in my refrigerator for the various ingredients is a lot more work than simply selecting them from choices already put in front of me at a restaurant.  Anyway, when I saw this idea that someone shared on Facebook I was quite excited, and I was determined to see if this method really works.  I added extra items based on my personal preferences, and spent most of an afternoon chopping red onions, green pepper, cucumber and carrots.  I also included one boiled egg per jar and added some bacon bits.   While this part of the preparation seemed rather time-consuming, once it was done the assembly process went quite quickly and it brought me great pleasure to see my refrigerator filled with premade salads.   The amount of dressing is up to you.  I started with ¼ cup and will see if that suits me.  I used the least expensive method of sealing, spending under $5 for the Zip-Loc hand vacuum.
I calculated an estimated calorie count for one of these salads, and was found that they were approximately 550 calories (the dressing and boiled egg carrying the majority).  I’m anxious to see how effective the vacuum process is.  If this works well, I hope to create a new habit towards eating healthier!
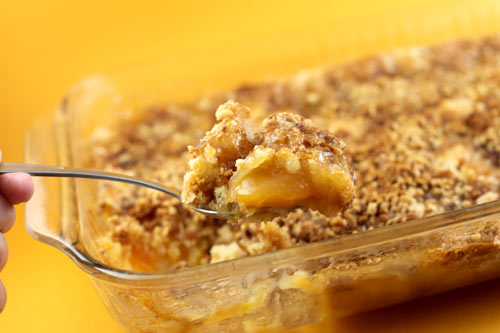
Salad in a Jar
THE ARRANGEMENT from BOTTOM to TOP:
Dressing
Shredded carrots
Cherry tomatoes
Sunflower seeds
Hard boiled eggs
Baby spinach

DIRECTIONS:
  1. Arrange ingredients in a large Mason jar
  2. Store in fridge for up to a week
  3. When ready to eat: shake jar, place on plate, and eat!

You can make any arrangement you want (add red onion, cucumbers, radishes, peppers, etc.).  Always remember to put the dressing at the bottom and the lettuce at the top – a MUST.

Friday, January 10, 2014

Peachy Cream Cheese Pie

I saw this on Pinterest today and followed the pages to finally get the recipe on the Recipe.Com site. It looks delicious and so easy. Gotta try it!

peachy cream cheese pie


This easy pie with its no-bake cream cheese filling makes a refreshing summertime dessert.


Recipe from

Servings: 8
Prep Time: 20 mins

ingredients

  • 3/4 cup vanilla wafer crumbs (about 17 cookies)
  • 2/3 cup ground toasted almonds
  • 1 tablespoon sugar
  • 1/3 cup margarine or butter, melted
  • 1 8 ounce package reduced-fat cream cheese (Neufchatel), softened
  • 1/4 cup sugar
  • 2 tablespoons frozen orange juice concentrate, thawed
  • 1 cup frozen whipped dessert topping, thawed
  • 3 cups peeled, sliced peaches
  • 1/4 cup orange marmalade
  • Raspberries (optional)

directions

In a medium bowl stir together wafer crumbs, toasted almonds, and the 1 tablespoon sugar; add melted margarine. Toss to mix well. Spread mixture evenly in a 9-inch pie plate, pressing onto bottom and up the sides of the pie plate. Bake in a 375 degree F. oven for 4 to 5 minutes or until edges are light brown. Cool completely on a wire rack.

Meanwhile, in a medium bowl beat cream cheese, 1/4 cup sugar, and orange juice concentrate with an electric mixer on medium speed until smooth. Fold in whipped topping. Spread over cooled crust. Cover surface with plastic wrap and chill at least 1 hour or up to 24 hours. Just before serving, arrange peach slices over filling. In a small saucepan, heat and stir the orange marmalade just until melted; brush onto peaches. If desired, garnish with raspberries. Makes 8 servings.

nutrition information

Per Serving: cal. (kcal) 389, Fat, total (g) 26, chol. (mg) 22, sat. fat (g) 10, carb. (g) 37, fiber (g) 2, pro. (g) 5, vit. A (RE) 237, vit. C (mg) 12, sodium (mg) 235, calcium (mg) 30, iron (mg) 1, Percent Daily Values are based on a 2,000

Monday, November 18, 2013

Christmas Decorations From Used Plastic Bottles

 I am always looking for recycling ideas from Used items. This is a great one and it is easy. It came from the Cresce bene sight which is Italian. Google has translated it. Anyway, it looks very easy. With a little gliiter and glue, you will become an artist!


Christmas tree decorations


 Chores Christmas for Kids: Christmas tree Needlework children's Christmas: Christmas Tree

Decorate your Christmas tree in 4 easy steps!
Materials
Instructions

A chore fast and nice, to create together with your children to decorate your tree Christmas !

How-to:

1. Retrieve plastic bottles of different colors.

2. Cut the bottom of the bottles and throw everything else.

3. Decorate each piece according to your imagination.

4. Pierce at the top of each piece and insert the colored ribbon.


Sunday, November 17, 2013

Cute Snowmen And So Easy To Make!

I am always looking for do it yourself things that are easy to make and are cute. Well, I just saw these cute snowmen on the Darkroom And Dearly Blog . I am definitely going to try these. The instructions are easy and they only take 10 minutes!

Snock Snowman

For this craft, you'll need a pair of old socks that are crew length, or longer. I went through Tanner's bag o' socks in our closet for my set. Don't worry, he'll never miss them -- he owns something like 10,000 pairs of socks, but insists on wearing shorts and flip-flops 365 days a year. Boys...
First, cut off the top of the sock from the foot.
Turn the sock inside out and attach a rubber band tightly to the top of the sock. Then turn the sock right-side out again.
Fill the sock with rice. Make sure to pack it down as you go so the sock gets a nice round base.
Rubber band the top of the sock closed and put another rubber band 3/4 of the way to the top for the head of your snowman.
Now, decorate! Tie a scarf around your snowman's neck and add eyes, nose, and buttons. I used map pins for my eyes. Unfortunately, I didn't have any black ones, so I colored white ones with sharpie and stuck them in.
Use the toe of your cut socks to fashion a stocking cap. Or you could use colored argyle socks to create hats and sweaters for your snowman, as seen at {then she made}.
You can either sew or glue on your buttons, and add embellishments - twine, bows, ribbons, etc - as needed.

This is such a quick and easy craft - 10 minutes tops - that it would be simple to create a whole family of snowmen for your mantle!

Tuesday, November 12, 2013

Healthy Spinach Lasagna Rolls

I tried this recipe tonight and it was so good! I did add a little basil to the filling. I saw it on Pinterest and it is on The Girl Who Ate Everything Blog. 

You just have to try it!

Healthy Spinach Lasagna Rolls

Yield: 9 lasagna rolls
Serving Size: 1 roll
Calories per serving: 224 calories; 6 WW Points Plus (see Note)

Ingredients

9 lasagna noodles, cooked 


1 (10 ounce) package frozen chopped spinach, thawed and completely drained 


1 (15 ounce) container fat free ricotta cheese 


1/2 cup grated Parmesan cheese
1 egg
1/2 teaspoon minced garlic
1/2 teaspoon dried Italian seasonings
salt and fresh pepper
 

(optional) 1 chicken breast, cooked and diced
  

32 oz tomato sauce (I used spaghetti sauce) 

9 Tablespoons part skim mozzarella cheese, shredded
 
Instructions

  • Preheat oven to 350°. 
  • Make sure you drain the spinach well. Combine spinach, ricotta, Parmesan cheese, egg, garlic, Italian seasonings, chicken, and salt and pepper in a medium bowl. 
  • Pour about 1 cup sauce on the bottom of a 9 x 13 baking dish.
  • Place a piece of wax paper on the counter and lay out lasagna noodles. Make sure noodles are dry by patting them with a paper towel. 
  • Take 1/3 cup of ricotta mixture and spread evenly over a noodle. Roll carefully and place seam side down onto the baking dish. Repeat with remaining noodles.
  • Ladle sauce over the noodles in the baking dish and top each one with 1 Tablespoon of mozzarella cheese. 
  • Cover baking dish tightly with aluminum foil and bake for 40 minutes, or until cheese melts. 
  • Makes 9 rolls.
  • To serve, ladle a little sauce on the plate and top with lasagna roll.

Notes

Adjust calories and points if you add chicken. adapted from Skinny Taste
Schema/Recipe SEO Data Markup by ZipList Recipe Plugin
2.2

Healthy Spinach Lasagna Rolls
Yield: 9 lasagna rolls
Serving Size: 1 roll
Calories per serving: 224 calories; 6 WW Points Plus (see Note)
Ingredients
  • 9 lasagna noodles, cooked
  • 1 (10 ounce) package frozen chopped spinach, thawed and completely drained
  • 1 (15 ounce) container fat free ricotta cheese
  • 1/2 cup grated Parmesan cheese
  • 1 egg
  • 1/2 teaspoon minced garlic
  • 1/2 teaspoon dried Italian seasonings
  • salt and fresh pepper
  • (optional) 1 chicken breast, cooked and diced
    campaignIcon
  • 32 oz tomato sauce (I used spaghetti sauce)
  • 9 Tablespoons part skim mozzarella cheese, shredded

This season, try a Cheesy Sausage Spread
Instructions
  1. Preheat oven to 350°. Make sure you drain the spinach well. Combine spinach, ricotta, Parmesan cheese, egg, garlic, Italian seasonings, chicken, and salt and pepper in a medium bowl. Pour about 1 cup sauce on the bottom of a 9 x 13 baking dish.
  2. Place a piece of wax paper on the counter and lay out lasagna noodles. Make sure noodles are dry by patting them with a paper towel. Take 1/3 cup of ricotta mixture and spread evenly over a noodle. Roll carefully and place seam side down onto the baking dish. Repeat with remaining noodles.
  3. Ladle sauce over the noodles in the baking dish and top each one with 1 Tablespoon of mozzarella cheese. Cover baking dish tightly with aluminum foil and bake for 40 minutes, or until cheese melts. Makes 9 rolls.
  4. To serve, ladle a little sauce on the plate and top with lasagna roll.
Notes
Adjust calories and points if you add chicken. adapted from Skinny Taste

Read more at http://www.the-girl-who-ate-everything.com/2011/04/spinach-lasagna-rolls.html#chpVQQfLhLo1xv73.99

Thursday, October 03, 2013

Mini Notebooks - what a great gift and they are so cute!


I saw these mini notebooks on the Girl On The Go Blog and thought this is such a great idea! And it is so easy! I knew that I had to share it with all of you! I plan to make these for my granddaughters and one for me. I just love to have something to write on in my purse.

The following was taken from Kellie's Blog:


notebooks 3


I think they are so cute when they are all lined up! I made 18 little books to go in the bags and I once again used the patterns from my Reprodepot Pattern Book. Here are the steps to making a mini notebook for yourself.

notebook 1


First of all, decide what size you want it to be. I made mine 3” x 2.5” when folded so when it’s flat the cover is 3” x 5”. That way, if you use an 8.5” x 11” sheet of paper, you can get 5 out of one sheet. Print and then cut your cover to size. I used cardstock for the cover.

notebook 7

For the pages I used regular computer paper but you could also use graph paper (I later made another one with graph paper) and it is so cute! I just didn’t have enough graph paper on hand to make all the books I needed so I used plain white. You could also used a mixture of papers as long as they are all light weight. Cut the plain paper to the same size (3” x 5”).
notebook 2

Fold all of your sheets of paper and your cover in half. You can already see it looking like a little book. I used 10 sheets of paper per book. My sewing machine couldn’t handle any more than that!notebook 3


For the ribbon place holder, put a small piece of double sided tape onto 
the top of the inside fold of the cover and place one end of the ribbon 
onto it. Then assemble the book again. I cut my ribbon to 4”.

notebook 4

Flatten out your book making sure that everything is lined up correctly and sew a straight stitch along the fold down the center. I used a contrasting thread for fun.

notebook 5

notebook 6


Fold your book again and ta-da! You are done! Aren’t they so cute? I love to carry a little notebook with me in my purse and these are just the right size.
.

Thursday, September 26, 2013

Applesauce Bread - sounds so good!

I received this recipe from a friend, Carolyn Carson, who got it from Cathy Greek. I am going to make it today - yessiree, today! I'll let you know how it turned out.


This is so simple to make and smelled so delicious as it baked!
You probably have all the ingredients already ~ Check it out!


Ingredients

1/2 cup of softened butter
1 large egg
1 1/2 t baking soda
3/4 t nutmeg
1 cup sugar
1 1/2 cups of flour
1 t ground cinnamon
1/2 t kosher salt
1 1/2 cups of applesauce
1 t of pure vanilla extract


Preheat oven to 350 degrees.

In a large bowl, first blend together the butter, egg, & sugar.
Then add the flour, baking soda, spices, & salt.
After it starts to from a crumbly dough, pour in the applesauce and mix together.


I used two small loaf pans, pouring mixture evenly into both.
I sprayed my pans with cooking spray first or you could use parchment paper, depending on the dish you choose to bake them in.

Bake at 350 degrees for about 40 minutes.

Saturday, September 07, 2013

“Through the Spectrum” – Spiral Crochet Scarf Pattern – FREE!


This is such a pretty crocheted scarf!! I love the colors! And the pattern is free. I just thought this would be a great Christmas gift and looks very easy to do. This pattern was from Expression Fiber Arts site.

free crochet scarf instructions how to 
Here are the instructions:

Yarn: Expression Fiber Arts Spectrum Wool, 1 skein, in Peacock Dewdrop. 
Hook: Size H
Pattern:  Ch 222.
Row 1: Sk 5, (dc, ch 2, dc) in next st. *Sk 2 ch, (dc, ch 2, dc) in next st. Repeat from * across. Turn.
Row 2: Ch 3. *(dc, ch2, dc, ch2, dc) in next ch2 sp. Repeat from * across. Turn.
Row 3: Repeat Row 2.

free crocheted scarf pattern peacock 

Tuesday, August 14, 2012

Cheesy Chicken Lasagna


This is a recipe from the Real Mom Kitchen Blog. I love lasagna and I love chicken. What a great idea to put them both together in one dish! I plan to make the lasagna and will let you know how it turns out. In the mean time, if you try it, let me know your results. Happy cooking!

chicken lasagna 6 450
Cheesy Chicken Lasagna

2 (12 oz) cans evaporated milk (not fat-free)
1 (1 oz) pkg. dry Ranch dressing mix
3 C. cubed, cooked, chicken
1/8 tsp pepper
1 (16oz) lasagna noodles, cooked (I recommend reducing it to 8 oz to 12 oz)
1 1/2 to 2 C cheddar cheese, grated
1 1/2 to 2 C mozzarella cheese, grated

Cook the chicken and noodles first at the same time. Once noodles are done–rinse in cold water and set aside (it keeps them from sticking together). Combine evaporated milk (don’t use fat-free version) and Ranch dressing in a 3 quart heavy saucepan. Heat over low heat, stirring frequently until dry ingredients are dissolved. Stir in chicken and pepper. Simmer, uncovered, 25 minutes (don’t do any less), stirring frequently. Layer half of lasagna noodles, poultry sauce, and cheese in well-buttered 9×13 pan. Repeat layers again. Bake at 350 for 35-40 minutes or until hot and bubbly. Let rest 10 minutes before serving.

Tuesday, August 07, 2012

I love easy!!

Yes, I love easy - easy recipes, easy quilts, easy jobs, and an easy life.
It's less stress ;-). Any way, when I saw this recipe on Bakerella , I just got so excited!!! She calls it "Ridiculously Easy". The recipe was sweet (I do have a sweet tooth) and it was easy!!! I love peaches whether they are fresh, frozen or in the can. So right after I finish blogging this recipe, I am going to the store to pick up some peaches. I'll let you know how it turns out ;-).
IMG_2336
You need some sliced peaches in syrup.

Just dump them in a 13 X 9 dish. Syrup and all.
IMG_2372
Cut the peaches into smaller pieces and you can distribute them more evenly.

Next up, you need a yellow cake mix.

IMG_2378
Sprinkle it right over the top of the peaches. No mixing. None.

Keep sprinkling until it’s all covered up.
IMG_2381
Then layer 1 stick of butter right on the top.
Next, add the brown sugar on top.
IMG_2390
Oh this is looking good. So fluffy. I need a spoon. No… I need to wait.
IMG_2402
Finally, add some chopped walnuts. These are optional.

Bake it at 350 degrees for about 40 minutes and voila…
IMG_2433
Here is the recipe:

Peach Crunch Cake

24.5 oz jar of sliced peaches in light syrup

1 package yellow cake mix

1 stick butter (1/2 cup), cut into 16 pieces

1 cup brown sugar

1/2 cup chopped walnuts

Preheat oven to 350 degrees F.

Layer ingredients in a 13 X 9 dish, in order starting with the peaches.

Bake for about 40 minutes.

Serve warm or cold… with or without ice cream

Wednesday, May 09, 2012

Quick Summer Fruit Salad


This fruit salad is a quick and easy one.  It also have a festive look to it because of the fruits used.  You can use whatever fruits that you like or are in season. You can whip this salad up in no time.  It calls for vanilla pudding mix but some people use lemon pudding that helps the bananas from turning brown.
Quick Summer Fruit Salad
  • 1 (5.1 oz) pkg vanilla instant pudding
  • 1 (20 oz) can pineapple tidbits with juice
  • 1 lb. fresh strawberries, quartered
  • 1 cup fresh blueberries (optional, I think marshmallows would be a yummy substitution)
  • 3 bananas, sliced
1. In a bowl combine the pudding mix and canned pineapple with the juice.  Stir until well blended and all the pudding mixture has dissolved.
2. Fold in the strawberries and blueberries if desired.  Refrigerate for at least 1 hour.
3. Just before serving, fold in the sliced bananas.
Adapted from Meals 4 Moms
I saw this on the Real Mom Kitchen Blog

Saturday, April 28, 2012

Stretching Shoes - What a Great Idea!

This is so neat! I will have to try this! My shoe size is an 8W and it is difficult to find shoes that fit and are comfortable. So I saw this on the SoleFood Site and on Pinterest. The directions are easy, although I am not crazy about putting shoes in the freezer, and you have 2 methods. Take a look and try it - I will be trying it!


Check them out below.


Freezing Method: best for when full toe or heel needs stretching


What you’ll need:

  • Ziploc bag 
  • Water 
  • Freezer 
Instructions:
  • Fill the plastic bag about a third to half way full. 
  • Let out as much air as possible from the bag. 
  • Insert plastic bag of water into problem area of shoe. 
  • Freeze the shoe overnight. 
  • Let ice thaw for about 20 minutes before removing from shoe. 
Try on and repeat if necessary.  Enjoy your beautiful, comfy shoes!


Heating Method: best for a quick stretch on leather

What you’ll need:

  • Thick socks 
  • Hair dryer
  • Leather conditioner 
Instructions:
  • Put on the shoes while wearing thick socks (this will be a tight fit). 
  • Heat the problem area of the shoe with your hairdryer. 
  • Flex your feet for 30 seconds while heating. 
  • Remove heat from shoes, but continue wearing until they’ve cooled. 
  • Try on and repeat if necessary. 
  • Apply leather conditioner to shoes to replenish the depleted moisture from the heat.