Showing posts with label recipe. Show all posts

Friday, August 03, 2012

I am going to make this!!!!

Yes!!! I plan to make this recipe this weekend!! I just can't wait!! I love red velvet!! I love cream cheese!! And I love brownies!!!

I saw this on Pinterest and went to the website that had the recipe: Honey What's Cooking


APPROXIMATE NUTRITION PER SERVING (yields 16 squares)

Calories: 192 cals
Fat: 11.3 g
Saturated Fat: 6.9 g
Carbs: 21 g
Protein: 2.9 g
Fiber: 0.25 g

RED VELVET SWIRL BROWNIES (adapted from Sunny Anderson)
~ yields 16 squares @ 350 degrees using a 8" x 8" baking tray
~ fat and calories were not reduced in this recipe.

INGREDIENTS:

Unsalted Butter – 8 tbsp (1 stick) – melted
Sugar – 1 cup
Vanilla Extract – 1 tsp
Ghirardelli Unsweetened Cocoa Powder – 1/4 cup
Pinch of salt
Red Food Coloring – 1 tbsp
Vinegar – 1/2 tsp (original recipe is 1 tsp)
Eggs – 2
All Purpose Flour – 3/4 cup

Cream Cheese Layer:

Cream Cheese – 8 ounces (softened)
Sugar – 1/4 cup
Egg – 1
Vanilla Extract – 1/8 tsp

DIRECTIONS for Brownie Layer:

1. Preheat the oven to 350 degrees and grease a baking tray.

2. Melt a stick of butter.
3. Once melted, add it to a mixing bowl.

4. Add sugar and vanilla extract. Blend until combined.

5. Add cocoa powder, pinch of salt, red food coloring, and vinegar.

6. Blend until well combined.

7. Add the blended eggs and combine until well incorporated.

8. Add the white flour.

9. Gently fold flour into batter.

10. Pour 3/4 of the batter into the prepared pan and reserve a 1/4 batter for later.

DIRECTIONS for Cream Cheese Layer:
11. In a separate bowl combine the cream cheese, 1 egg, sugar, and vanilla extract.

12. Blend until smooth and creamy.

13. Add the cream cheese layer over the brownie mixture.

14. Spread.

15. Add the remaining red velvet batter.

16. Swirl.

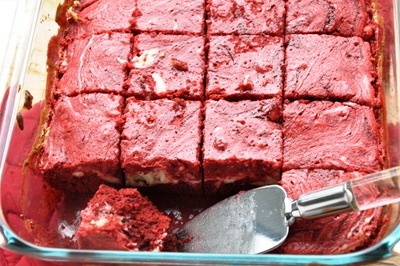
17. Into the oven for 30 minutes exactly – DO NOT OVERBAKE.

18. This is what you should have.

19. Cut into 16 squares. Refrigerate before serving - it tastes much better if you do.

red velvet 036


Thursday, May 24, 2012

5-minute cream cheese danish


I have tried the cream cheese danishes with the crescent rolls and they turned out very good! Now here is a recipe that looks special and like a danish should look.

If you have a can of crescent rolls and a package of cream cheese, you're in business.

Recipe after the jump!

Firstly, preheat your oven to 375 degrees (190 Cesius, for my Canadian friends) and line a cookie sheet with foil. Then, dump your ingredients into a mixing bowl.

8 oz cream cheese (softened)
1/2 c. powdered sugar
1 egg
pinch of salt

Mix these until they're smooth; set aside. Open your fridge and grab your can of rolls.

Unroll your cresent rolls onto a sheet of wax paper, but don't separate them. Pinch the seams together, like so:

Use a small, sharp knife to score the edges like I've shown here:

Don't fill it too full, just use about 80% of your filling.
Then fold the bottom part of the dough up and tuck it around the filling.

Begin "braiding" your dough, crossing one little flap over on one side, then the other, until you've gotten to the top. Fold the top of the dough over and tuck it around the other end of the filling. Carefully place your danish on your foil lined cookie sheet.

Bake at 375 for 15 minutes or so. While this is cooking, make your glaze.

1/2 c. powdered sugar
1/2 tsp. vanilla extract
1 TB milk

Whisk these together in a small bowl until smooth.

Left the foil with the danish on it from your cookie sheet and let it cool on a wire rack. This prevents the bottom of the danish from continuing to cook on the hot pan.

When it's cooled a bit, drizzle your glaze over it. Serve it for brunch and blow everybody's mind.


I found the recipe at : Crafty Butt Blog

Alex's Mocha Melted Ice-Cream Cake with Chocolate Marshmallow Frosting

Looks like I am taking an interest in recipes ;-), especially deserts! This just looked so good!!


Incredible Melted Ice-Cream Cake
by Anne Byrn

1 package (18.25 ounces) plain white cake mix (one without pudding in the mix!)
2 cups melted ice cream, your choice of flavor (I used Häagen-Dazs coffee)
1 tablespoon instant coffee or espresso powder
3 large eggs
2/3 cup mini chocolate chips
Chocolate Marshmallow Frosting (see below)

Place a rack in the center of the oven and preheat the oven to 350F. Lightly mist a 12-cup Bundt pan with vegetable oil spray, then dust with flour. Shake out the excess flour. Set the pan aside. (Or just use Pam with Flour - I love this stuff!)

Place the cake mix, melted ice cream, instant coffee, and eggs in a large mixing bowl. Blend with an electric mixer on low speed for 1 minute. Stop the machine and scrape down the sides of the bowl with the rubber spatula. Increase the mixer speed to medium and beat 2 minutes more, scraping the sides down again if needed. The batter should look thick and well blended. Add chocolate chips and mix just until it's best combined. Pour the batter into the prepared pan, smoothing the top with the rubber spatula. Place the pan in the oven.

Bake the cake until it springs back when lightly pressed with your finger and just starts to pull away from the sides of the pan, 38 to 42 minutes. Remove the pan from the oven and place it on a wire rack to cool for 20 minutes. Run a long, sharp knife around the edge of the cake and invert it onto a small rack, then invert it again onto a second rack so that the cake is right side up to complete cooling, 30 minutes more.

Meanwhile prepare the Chocolate Marshmallow Frosting: Slide the cake onto a serving platter and pour the warm frosting over the cake (you will have a little extra). Let it stand for at least 10 minutes before serving. 

Marshmallow Frosting
2 cups confectioners' sugar
1/2 cup unsweetened cocoa powder
6 large marshmallows or 3/4 cup marshmallow fluff
4 tablespoons (1/2 stick) butter
1/4 cup whole milk or whipping cream
1 teaspoon pure vanilla extract

Sift the sugar and cocoa powder together into a large mixing bowl.

Set aside. Place the marshmallows, butter, and milk/cream in a medium-size heavy saucepan over low heat. Stir until the marshmallows are melted, 2 to 3 minutes. Remove the pan from the heat. Pour the confectioners' sugar and cocoa mixture over the marshmallow mixture. Add the vanilla and stir until the frosting is smooth and satiny.

Use at once to frost the top of the cake of your choice.For the garnish, I used marshmallow fluff to "glue" on chocolate covered coffee beans.


Tuesday, May 22, 2012

Creamy Orange Cake

When I saw the picture of this cake, I just knew that I wanted to make it! It is a great cake to make in the summertime! Orange just seems so refreshing. I can't wait to make it!


Ingredients
1 (18.25 ounce) package orange cake mix
1 (3 ounce) package orange flavored gelatin mix
1 cup boiling water
1 (3.4 ounce) package instant vanilla pudding mix
1 cup milk
1 teaspoon vanilla extract
1 teaspoon orange extract
1 (8 ounce) container frozen whipped topping, thawed

Directions
  • Prepare and bake cake mix according to package Directions for a 9x13 inch pan. Poke holes in cake while still hot with the round handle of a wooden spoon.
  • In a medium bowl, make gelatin with only 1 cup of boiling water. Pour liquid gelatin over cake while hot. Cool cake completely.
  • In a medium bowl, make vanilla instant pudding with only 1 cup of milk. Stir in vanilla and orange extract. Fold in whipped topping. Spread evenly over cake. Refrigerate cake for 1 hour before serving.
Here is the link: Tricks Chefs Site

Tuesday, April 24, 2012

I have been busy.....

Hi! I have been busy doing some of the projects that I previously posted. I made another chalkboard placemat for one of my granddaughters. The colors are brighter and it shows up better. The black chalk fabric had to be primed first and that is why it looks hazy. Priming consists of rubbing chalk on it. Here is the link for directions: We All Sew .


The next thing that I did was finally sew a zippered bag. I have always been scared to death to sew zippers. I guess you could call me a zipperlockhead! I saw this on tutorial on Pinterest and finally tried it. The pinners said it was a good tutorial and was easy. It even has a lining! I need to do another one because this one was my first. It turned out OK but I learned a lot and thought of various modifications. Hope you like it. Here is the link for the tutorial  Zipper Lined Pouch Tutorial


The last thing that I tried was modifying the lemon bar recipe. I used strawberry pie filling instead of the lemon. The recipe is easy - 2 ingredients - angel food cake and pie filling. It is just so good!!! I haven't decided which one I like better. Future bars could be cherry, blueberry, and apple. Here is a link for the directions:2 Ingredient Lemon Bars


Thursday, April 19, 2012

Lemon Cake Recipe

This cake sounds so good and it is healthy!!! It uses a box cake mix (makes it faster). What more could you want?

Lemon Cake RecipePhoto by: Taste of HomeLemon Cake Recipe

Lemon Cake Recipe

Prep: 20 min. Bake: 25 min. + cooling
Yield: 15 Servings

Ingredients
  • 1 package (18-1/4 ounces) white cake mix
  • 1 package (3 ounces) lemon gelatin
  • 1 cup plus 2 tablespoons water
  • 4 egg whites
  • 1/3 cup unsweetened applesauce
  • 1 tablespoon canola oil
  • 1 teaspoon lemon extract
  • 4 drops yellow food coloring, optional
LEMON GLAZE:
  • 1-1/2 cups confectioners' sugar
  • 1/3 cup lemon juice
Directions
  • In a large bowl, combine the cake mix, gelatin, water, egg whites, applesauce, oil, lemon extract and food coloring if desired; beat on low speed for 30 seconds. Beat on medium for 2 minutes.
  • Pour into a 13-in. x 9-in. baking pan coated with cooking spray. Bake at 350° for 25-30 minutes or until edges are lightly browned and a toothpick inserted near the center comes out clean. Cool on a wire rack for 10 minutes.
  • Meanwhile, for glaze, in a small bowl, combine confectioners' sugar and lemon juice until smooth. Drizzle about a third of glaze over cake; carefully spread evenly. Repeat with remaining glaze. Cool completely. Yield: 15 servings.
Nutritional Analysis:1 piece equals 225 calories, 5 g fat (1 g saturated fat), 0 cholesterol, 266 mg sodium, 43 g carbohydrate, trace fiber, 3 g protein.

Originally published as Lemon Cake in Light & Tasty April/May 2005, p27

Wednesday, April 18, 2012

Pineapple Upside Down Cake

Pineapple Upside Down Cake


I made this cake yesterday with a few modifications and it was just so good! I used a 13X9 glass cake pan. I used pineapple chunks - that way everyone gets some pineapple. Since I used a different pan, I did not bake it for 1 hour. After 35 minutes, a beautiful pineapple smell enticed me to look at how the cake was doing. It was getting brown on top, actually a dark brown, so I put a sheet of aluminum foil on top so it would not burn. I waited about 5-10 minutes longer, put a toothpick in the middle and took the cake out of the oven. The toothpick came out clean (it was done!) so I inverted the cake on a cookie pan. This cake was just so good! My husband ate so many pieces that I had to put it away. You just have to try it!

Here is the recipe from Duncan Hines :

Hands-On Time: 10 minutes
Total Time: 1 hour and 15 minutes
Servings: Makes 16 to 20 servings.
Rating: 5 stars

Ingredients:
Topping:

· 1/2 cup (1 stick) butter or margarine

· 1 cup firmly packed brown sugar

· 1 (20 oz) can pineapple slices

· Maraschino cherries

Cake:

· 1 pkg Duncan Hines® Moist Deluxe® Pineapple Supreme Cake Mix

· 1 (3.4 oz) pkg vanilla instant pudding and pie filling

· 4 large eggs

· 1 cup water

· 1/2 cup oil

Baking Instructions

1. Preheat oven to 350°F.

2. For topping, melt butter over low heat in 12-inch cast-iron skillet or skillet with oven-proof handle. Remove from heat. Stir in brown sugar. Spread to cover bottom of skillet. Arrange pineapple slices, Maraschino cherries and walnut halves in skillet. Set aside.

3. For cake, combine cake mix, pudding mix, eggs, water and oil in large mixing bowl. Beat at medium speed with electric mixer for 2 minutes. Pour batter evenly over fruit in skillet.

4. Bake at 350 ºF for 1 hour or until toothpick inserted in center comes out clean. Invert onto serving plate.

Copyright © 2012 Pinnacle Foods Corp. LLC. All Rights Reserved.

Friday, March 23, 2012

Flower Power Cake Recipe

This cake just looks so pretty and the recipe is easy! I think I might just try it for Easter!

Flower Power Cake 

Flower Power Cake Recipe

Makes: 12 to 16 servings
Prep: 30 mins
Cool: 10 mins
Bake: 350°F 30 mins


ingredients
1 2-layer-size package lemon cake mix
1 16 ounce can white frosting
Small gumdrops
Candy-coated fruit-flavored pieces
Sour fruit-flavored straw candy

directions

1.Preheat oven to 350 degrees F. Prepare and bake cake mix according to package directions using two 8- or 9-inch round baking pans. Cool on wire racks for 10 minutes. Remove from pans. Cool completely.

2.Place 1 cake layer on a serving plate; spread with frosting. Top with remaining cake layer. Frost top and side of layers with frosting.

3.To decorate cake with flowers, slice small gumdrops in half horizontally to form flower petals. Use candy-coated fruit-flavored pieces for flower centers. Flatten gumdrops and cut into leaf shapes for leaves. Snip sour straws to desired lengths and use for flower stems.

Here is the link: http://www.bhg.com/recipe/layer-cakes/flower-power-cake/

Tuesday, March 06, 2012

Easy Cheese Danish


This recipe is just SO good and it is easy!!! You just have to try it. I got the recipe from http://kitchengirljo.blogspot.com  and made it the other day. My husband just loves it. Everyone who eats it, just loves it. I love it!

You can go to the link: http://kitchengirljo.blogspot.com/2009/07/easy-cheese-danish.html or just see the recipe below:

Ingredients:
2 cans ready to use refrigerated crescent rolls
2 8-ounce packages cream cheese
1 cup sugar
1 teaspoon vanilla extract
1 egg
1 egg white

Glaze:
1/2 cup powdered sugar
2 Tablespoons milk
1/2 teaspoon vanilla extract

Method:
Preheat oven to 350* degrees and grease a 13X9-inch baking pan. Lay a pack of crescent rolls in the pan and pinch the openings together. Beat the cream cheese, sugar, vanilla, and egg together until smooth. Spread the mixture over the crescent rolls evenly and then lay the second pack of crescent rolls on top of the cheese mixture and brush with egg white. Bake for 35-45 minutes until the top is golden brown. Top with glaze after cooling for 20 minutes.

Kitchen Notes from the blog:
I have made this danish using low fat cream cheese and splenda (sugar substitute) and it was delicious! Also, the amount of filling the original recipe calls for makes a VERY heavily filled danish. I have halved the filling using 1 package of cream cheese, 1/2 cup of sugar, 1 whole egg, and a 1/2 teaspoon of vanilla extract and it was still very good. If you use the half filling method, bake for closer to 30-35 minutes.

Tuesday, February 28, 2012

Easy 2 Ingredient Fudge and Oh So Good


I tried this fudge last week and it was so easy but even better – it was so good!

Ingredients:
Serves: 48 Yield:1

8×8 pan Units: US | Metric
1 (12 ounce) package semi-sweet chocolate chips
1 (14 ounce) can sweetened condensed milk

Directions:
1 Place both ingredients in a microwave safe 8″ x 8″ dish.
2 Microwave on high for 2 to 3 minutes.
3 Remove (with oven mitts, please) and stir to combine.
4 Place in the refrigerator for 2 hours to set.
5 Fudge can be removed from refrigerator and stored at room temperature after it has set.
6 Once at room temperature you can melon scoop it, roll it in powdered cocoa and chopped nuts, and serve as truffles.


Sunday, February 12, 2012

Cabbage Roll Casserole Recipe

Hi! My ancestors came from Poland and I have taken the time to make cabbage rolls by rolling them up and keeping them together with toothpicks. Then you have to worry about someone eating a toothpick or the roll falls apart. 


Then I saw this casserole that looks so easy and has the same ingredients but you don't have to roll them or use toothpicks.
Here is the recipe: 

You need:
1 pound ground beef
1 medium onion,diced
4 cloves garlic,minced
1 tsp dried basil
1- 14.5 oz can beef broth
1- 15 oz can tomato sauce
1- 11.5 oz can tomato juice
1 medium sized cabbage, chopped
1 1/2 c. instant brown rice
 salt and pepper


Directions:
In a large saucepan cook ground beef, onion, garlic, basil, salt and pepper until beef is cooked through. Add broth, tomato sauce and tomato juice and remove from heat. Meanwhile chop cabbage. In a 9x13 pan add cabbage and rice. Pour ground beef mixture over rice and cabbage, stir to combine. Bake in a 350 degree oven for 1 hour, stirring a couple times throughout baking.