Saturday, May 12, 2012

Happy Mother's Day!!!


Just wanted to say Happy Mother's Day to all mothers. Some of you have had children, some would like to have children, some adopt children, some are in the process of having children, some of you appreciate and love children as if they are your own. I just wanted to say "Thank You!" to all of you. 


And there are some of you who miss your mothers who have passed. Just know that she will always love you and she sends a great big hug to you. 


Have a great day!

How-To: Print on Fabric with an Inkjet Printer


I saw this today and just had to copy it so you could see it. I have always wondered how I could make my own fabric designs and this tutorial will instruct you on using an ink jet printer. I want to try it so my fabric can be unique! How about you?


About Ink
Printing your own fabric is not as difficult as it sounds, and you don't need any special equipment to get started. The only secret to a successful print is to make sure that you have the right type of ink. Cheap printer cartridges and refills often use a dye-based ink that colors unpredictably on fabric, and may even wash out completely in water.

More expensive printer cartridges use pigment ink. Pigment ink is colorfast on many different surfaces, and is much more useful for printing on fabric.

Unfortunately, finding out if you have pigment ink or dye is not always straightforward. Your printer manual is a good place to start, and a physical examination of the ink should settle the matter beyond doubt. When the printer cartridges need changing, remove the yellow ink and place some on a piece of glass. Yellow pigment ink will be vibrant but opaque, while yellow dye will be transparent and almost brown in color.

Disclaimer: Not all printers can print on fabric, and putting fabric through your printer could damage it permanently. This is an experimental technique, and you should only try it if you understand that it involves an element of risk.

Materials

Light-colored fabric
Printer that uses pigment inks
Scissors
Card
Sticky tape

Directions


Fabric Printing Step1
Step 1: Choose a light-colored, flat fabric, and cut it to the maximum width that your printer can handle. I have an Epson R1800, so it can take just over A3+ width of fabric. If your printer supports printing from a roll, then you can make the fabric as long as you like. Otherwise you will need to cut the fabric into sheets. If you are using a long length of fabric, you might want to roll it onto a cardboard tube to make it more manageable.
Fabric Printing Step2

Step 2: Take a piece of card the same width as the fabric and fix the end of fabric to the card using sticky tape. The card works like a leader, giving the printer something to hold onto when you first start printing. I use a piece of card about 10" long, and tape the fabric about 2" in from the end. Once the card is through the printer, the weight will help keep the fabric running smoothly.

Step 3: Feed the card into the printer. On the Epson R1800, I use the roll feed to accept the paper, because the paper enters the printer at a more shallow angle and also because I can print unlimited lengths using the banner mode of the printer.

Fabric Printing Step4
Step 4: Create your design on the computer, and then print it out. Keep a constant eye on the printer while it is running, and watch that the fabric doesn't get creased or jam up the head. If you do have a problem, turn the printer off at the wall and clear the fabric manually before restoring power. Do not pull or move the fabric while it is still being printed. Slight changes in fabric tension can make your design distort, and increase the chance of creases forming.
Fabric Printing Step5

Step 5: You will need to fiddle around with the brightness / color settings on your printer to get the design looking right. Each fabric is slightly different, and experimentation is absolutely necessary if you want to get good results.

Step 6: When the printing is finished, you should leave your new custom fabric to dry for about an hour. You might find that some of the ink comes off on your hands when you first handle the fabric. This is normal, and is nothing to worry about. Simply rinse the fabric in warm water to remove any excess pigment, and then hang it out to dry
.
Fabric Printing End

Step 7: When the fabric is dry, iron the reverse side at low temperature. From this point onwards, the fabric can be treated just like shop-bought fabric. I recommend using a cool wash and ironing on the reverse side where possible to help preserve the colors.

This tutorial came from the Craft Blog

About the Author: Andrew Lewis is a journalist, a maker, an ardent victophile, and the founder of the www.upcraft.it blog. He is currently studying for a PhD. in archaeometrics and 3D scanning at the University of Wolverhampton.

Wednesday, May 09, 2012

Cucumber and Tomato Salad


This salad is just so good! And it is easy to make! This salad reminds me of the fresh vegetables of summer. Even though it has been a damp overcast kind of week, it brings the smell of summer to the house.
Cucumber and Tomato Salad
  • 3 medium sized cucumbers or 6 mini cucumbers (I used mini’s)
  • 1 (10.5 oz) container of grape tomatoes, halved
  • 1 medium red onion, finely diced
  • 6 sprigs of fresh dill (you can sub 1 tsp dill weed but fresh is best here)
  • 1 cup zesty Italian salad dressing
  • Salt and pepper to taste
  1. Quarter or halve the cucumbers depending on the size used, then slice into 1/4″ pieces.
  2. Place the cucumbers in a bowl and add the grapes, onion, and dill.
  3. Toss the cucumber mixture with the Italian dressing until evenly coated with salad dressing.  Add some salt and pepper to taste. Refrigerate for at least one hour before serving.  The longer the better.
Recipe adapted from Bluebonnets and Brownies.
I saw this recipe on Real Mom Kitchen Blog

Quick Summer Fruit Salad


This fruit salad is a quick and easy one.  It also have a festive look to it because of the fruits used.  You can use whatever fruits that you like or are in season. You can whip this salad up in no time.  It calls for vanilla pudding mix but some people use lemon pudding that helps the bananas from turning brown.
Quick Summer Fruit Salad
  • 1 (5.1 oz) pkg vanilla instant pudding
  • 1 (20 oz) can pineapple tidbits with juice
  • 1 lb. fresh strawberries, quartered
  • 1 cup fresh blueberries (optional, I think marshmallows would be a yummy substitution)
  • 3 bananas, sliced
1. In a bowl combine the pudding mix and canned pineapple with the juice.  Stir until well blended and all the pudding mixture has dissolved.
2. Fold in the strawberries and blueberries if desired.  Refrigerate for at least 1 hour.
3. Just before serving, fold in the sliced bananas.
Adapted from Meals 4 Moms
I saw this on the Real Mom Kitchen Blog

Tuesday, May 01, 2012

Family and Friends - just so precious!

I was on Pinterest this morning, just pinning away and enjoying other's pins when I saw this one:


This pin just hit home for me. Family is so important and we all know that one way or another. Friends, especially friends that are described in the above, are very, very special. They are people who have met you and still like/love you even though they have seen you at your worst. They are people who you don't hear from them for months and the next thing you know, the phone is ringing and it is them asking how you are doing. It was as if they knew to call you or you knew to call them. They are the friends that can listen to you sound off about something insignificant and will let you talk and talk until you get it off of your chest. They put smiles on your faces and laugh with you being silly. They are the best of friends.


Call your friend, email them, or go see them. They may need you today.

Saturday, April 28, 2012

Stretching Shoes - What a Great Idea!

This is so neat! I will have to try this! My shoe size is an 8W and it is difficult to find shoes that fit and are comfortable. So I saw this on the SoleFood Site and on Pinterest. The directions are easy, although I am not crazy about putting shoes in the freezer, and you have 2 methods. Take a look and try it - I will be trying it!


Check them out below.


Freezing Method: best for when full toe or heel needs stretching


What you’ll need:

  • Ziploc bag 
  • Water 
  • Freezer 
Instructions:
  • Fill the plastic bag about a third to half way full. 
  • Let out as much air as possible from the bag. 
  • Insert plastic bag of water into problem area of shoe. 
  • Freeze the shoe overnight. 
  • Let ice thaw for about 20 minutes before removing from shoe. 
Try on and repeat if necessary.  Enjoy your beautiful, comfy shoes!


Heating Method: best for a quick stretch on leather

What you’ll need:

  • Thick socks 
  • Hair dryer
  • Leather conditioner 
Instructions:
  • Put on the shoes while wearing thick socks (this will be a tight fit). 
  • Heat the problem area of the shoe with your hairdryer. 
  • Flex your feet for 30 seconds while heating. 
  • Remove heat from shoes, but continue wearing until they’ve cooled. 
  • Try on and repeat if necessary. 
  • Apply leather conditioner to shoes to replenish the depleted moisture from the heat.

Tuesday, April 24, 2012

Still busy...

Last year I had bought some ABC panels that I was going to make wall hangings for my granddaughters. Today I got up and decided I would make one for my daughter. She does daycare in her house and this would help the children to learn their ABCs. So I used one panel and put borders on it with bright colors (I like bright colors!), added batting, and fabric for the back. Voila! (that's French), here it is:


So let me know what you think and any ideas that you have for the next three,

I have been busy.....

Hi! I have been busy doing some of the projects that I previously posted. I made another chalkboard placemat for one of my granddaughters. The colors are brighter and it shows up better. The black chalk fabric had to be primed first and that is why it looks hazy. Priming consists of rubbing chalk on it. Here is the link for directions: We All Sew .


The next thing that I did was finally sew a zippered bag. I have always been scared to death to sew zippers. I guess you could call me a zipperlockhead! I saw this on tutorial on Pinterest and finally tried it. The pinners said it was a good tutorial and was easy. It even has a lining! I need to do another one because this one was my first. It turned out OK but I learned a lot and thought of various modifications. Hope you like it. Here is the link for the tutorial  Zipper Lined Pouch Tutorial


The last thing that I tried was modifying the lemon bar recipe. I used strawberry pie filling instead of the lemon. The recipe is easy - 2 ingredients - angel food cake and pie filling. It is just so good!!! I haven't decided which one I like better. Future bars could be cherry, blueberry, and apple. Here is a link for the directions:2 Ingredient Lemon Bars


Sunday, April 22, 2012

The Only Flag That Doesn't Fly

A friend sent me this picture and I was just so moved by it! I will not add anymore description except for the description included in her email.


Between the fields where the flag is planted, there are 9+ miles of flower
fields that go all the way to the ocean. The flowers are grown by seed
companies. It's a beautiful place, close to Vandenberg AFB. 

Check out the dimensions of the flag. The Floral Flag is 740 feet long and 390 feet wide and maintains the proper Flag dimensions, as described in Executive
Order #10834. This Flag is 6.65 acres and is the first Floral Flag to be
planted with 5 pointed Stars, comprised of White Larkspur. Each Star is
24 feet in diameter; each Stripe is 30 feet wide. This Flag is estimated to
contain more than 400,000 Larkspur plants, with 4-5 flower stems each,
for a total of more than 2 million flowers.

It's just beautiful!


Cordwood Home Design

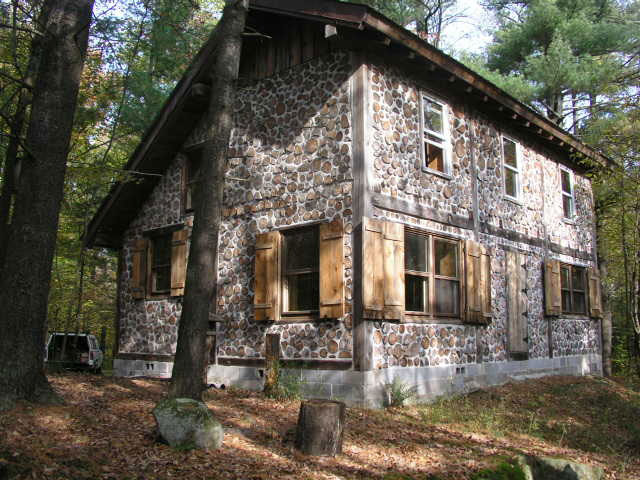
When I saw the story on cordwood home designs, it sparked my curiosity. This home is made of firewood logs. It is green and energy efficient!

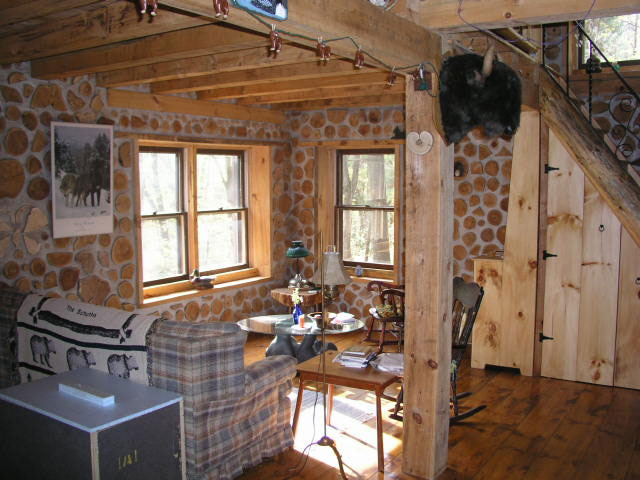
A framework of heavy timbers supports the roof. Inside the timber framework, 16-inch long chunks of firewood are stacked to build the walls. This house is built with cedar, but tamarack, pine and poplar 
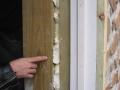
work well. Mortar holds the logs in place and foam insulation fills any voids in the middle.
Larger view

To save money, some builders use sawdust as insulation. The walls of a cordwood home have nearly twice the insulation value of a traditional home.
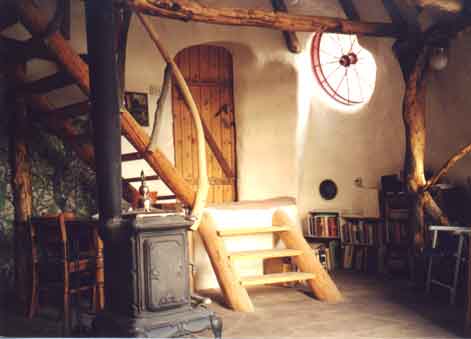
The ends of the logs are visible inside and outside, giving the house a distinctive look.

Glass bottles embedded in the walls bring beams of colored light into the living space. The wood chunks can be arranged in purposeful designs.
Rob Roy stated on the Green Home Building site: After studying the wide array of "natural building" techniques for several years, I have come to accept cordwood as one of the greenest of all: it uses what is often considered a waste material, creates an insulated wall that requires no further finishing or maintenance over time, and can be done by relative novices...what more could you want?"

As you can see below, the cordwood home is rustic, unique, and beautiful!