This is such a great idea! It is a living wreath of plants. It is fairly easy and not that expensive. You can use supplies you already have around the house.
The tutorial has many pictures so rather than copying the entire tutorial, here is the link: http://prudentbaby.com/2010/12/prudent-home/diy-simple-stunning-living-succulent-wreath-2/
This blog is about anything and everything.
Welcome To My Blog
My interests are sewing, quilting, NASCAR, and camping. I am married to a street rodder. We have multiple old cars - 1961 Willys Jeep Station Wagon and some Mopars. My husband's name is Denny and he has been into old cars for a long time. We have 5 children and 11 grandchildren that are just the greatest children ever! They are smart, beautiful, funny all rolled in together! We have 1 dog, Marcy, who is a St. Bernard and 1 cat that just showed up one day named Happy. She showed up during a NASCAR race and we named her after the winner - Happy Harvick.
I do hope you like my blog. It includes a variety of things and I may not be on it everyday, but I try to add things as much as possible.
Sunday, March 18, 2012
Thursday, March 15, 2012
Drawing made out of thread by Amanda McCavour
Here is another drawing made from thread on fabric that disappears in water. This just amazes me! Amanda McCavour is definitely artistic! What do you think?


farewell-kingdom:


farewell-kingdom:
Drawing made out of thread by Amanda McCavour
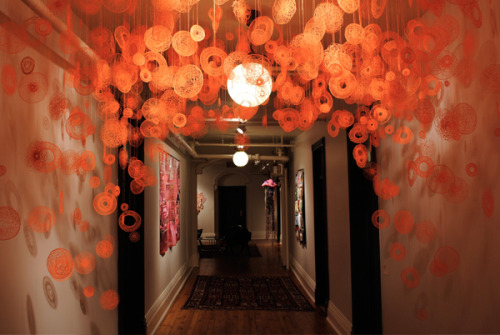
Amanda McCavour's Thread Drawings
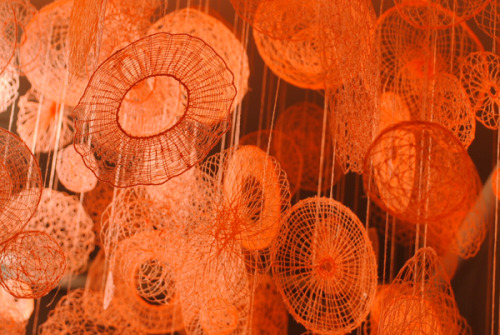
I found this so interesting. Amanda McCavour makes these with her sewing machine, threads, and fabrics that dissolves in water. Who would have thought? Anyway, these pictures represent her living room. Don't you just love these? I sure do!


Amanda McCavour creates incredible images with thread. She describes how she does it on her website:
In my work, I use a sewing machine to create thread drawings and installations by sewing into a fabric that dissolves in water. This fabric makes it possible for me to build up the thread by sewing repeatedly into my drawn images so that when the fabric is dissolved, the image can hold together without a base. These thread images appear as though they would be easily unraveled and seemingly on the verge of falling apart, despite the works actual raveled strength.
The images above are from an installation called "Living Room," in which McCavour made life-sized drawings of all the stuff she once had in her living room.
Tuesday, March 13, 2012
Tracing Paper Dolls for the Silhouette to Print and Cut
Tracing Paper Dolls for the Silhouette to Print and Cut
I saw this tutorial and just thought it would be so neat for my granddaughters. They love the "princesses" and would love playing with these. I didn't copy all the steps because it is a little long. You can go here: http://findingtimetocreate.blogspot.com/2011/03/tracing-paper-dolls-for-silhouette-to.html to see the entire tutorial.
Tuesday, March 06, 2012
Easy Cheese Danish
This recipe is just SO good and it is easy!!! You just have to try it. I got the recipe from http://kitchengirljo.blogspot.com and made it the other day. My husband just loves it. Everyone who eats it, just loves it. I love it!
You can go to the link: http://kitchengirljo.blogspot.com/2009/07/easy-cheese-danish.html or just see the recipe below:
Ingredients:
2 cans ready to use refrigerated crescent rolls
2 8-ounce packages cream cheese
1 cup sugar
1 teaspoon vanilla extract
1 egg
1 egg white
Glaze:
1/2 cup powdered sugar
2 Tablespoons milk
1/2 teaspoon vanilla extract
Method:
Preheat oven to 350* degrees and grease a 13X9-inch baking pan. Lay a pack of crescent rolls in the pan and pinch the openings together. Beat the cream cheese, sugar, vanilla, and egg together until smooth. Spread the mixture over the crescent rolls evenly and then lay the second pack of crescent rolls on top of the cheese mixture and brush with egg white. Bake for 35-45 minutes until the top is golden brown. Top with glaze after cooling for 20 minutes.
Kitchen Notes from the blog:
I have made this danish using low fat cream cheese and splenda (sugar substitute) and it was delicious! Also, the amount of filling the original recipe calls for makes a VERY heavily filled danish. I have halved the filling using 1 package of cream cheese, 1/2 cup of sugar, 1 whole egg, and a 1/2 teaspoon of vanilla extract and it was still very good. If you use the half filling method, bake for closer to 30-35 minutes.
Friday, March 02, 2012
Reusable Shopping Bag
Reusable Shopping Bag
This is a tutorial from the
Cricut site: http://www.cricut.com/projects/?prj=1331
View Project Details : Reusable Shopping Bag
Instructions
What You Will Need
Other Supplies
|
Bunny Bag Tutorial
Bunny Bag Tutorial
This is a great Easter gift that you can make for your children or grandchildren. It's a bunny bag. This is the site that you can go to for the tutorial: http://www.red-brolly.com/red-brolly/2011/03/its-bunny-time.html
Wednesday, February 29, 2012
Tuesday, February 28, 2012
Easy Caramel Buns
Caramel Buns
1/4 cup butter
1/4 cup brown sugar
2 Tbsp. maple syrup
1/2 tsp. cinnamon
1 (7.5 oz) can refrigerated biscuits
First, melt the butter on a dinner plate. Add the brown sugar, syrup and cinnamon. Mix it with the butter on the plate. Place the biscuits on top of the caramel mixture. Microwave on high for 3 1/2 minutes.
The link that the recipe came from is: http://livingpractically.blogspot.com/search/label/Cooking
2 ingredient lemon bars – hmmm good
I tried this recipe last week and everyone just loved it!
Two-Ingredient Lemon Bars
FYI – I did try this recipe and it was so delicious! And it was easy!. You have to try it!
———————————————————————————————————
This simple, two-ingredient lemon bar is a nostalgic recipe for me. A friends mother had made these lemon bars for a birthday party, and my mom asked for the recipe. I remember my mom telling me that it was easy enough for me to make – it was one of the first recipes I remember making mostly on my own. As a result, every time I make these bars, I recall every detail of the birthday party from the games we played and the weather to the park where it was held.
While I don’t expect, you to get all nostalgic putting together this easy recipe, it is one of the easiest bar recipes I have ever found. All you need it an angel food cake mix and a can of lemon pie filling.
Mix them together and bake in a 9×13 cake pan at 350 degrees for 20 minutes. As they are cooling, you can sprinkle with powder sugar if you wish (Which I guess technically makes this a 3-ingredient recipe).
Subscribe to:
Comments (Atom)


