Tuesday, August 07, 2012

I love easy!!

Yes, I love easy - easy recipes, easy quilts, easy jobs, and an easy life.
It's less stress ;-). Any way, when I saw this recipe on Bakerella , I just got so excited!!! She calls it "Ridiculously Easy". The recipe was sweet (I do have a sweet tooth) and it was easy!!! I love peaches whether they are fresh, frozen or in the can. So right after I finish blogging this recipe, I am going to the store to pick up some peaches. I'll let you know how it turns out ;-).
IMG_2336
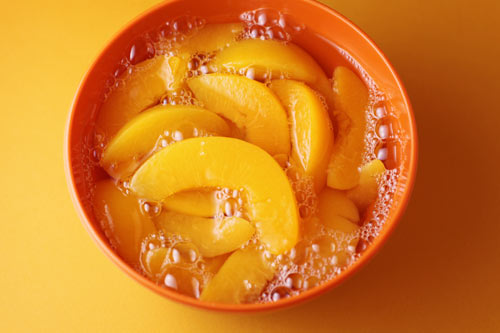
You need some sliced peaches in syrup.

Just dump them in a 13 X 9 dish. Syrup and all.
IMG_2372
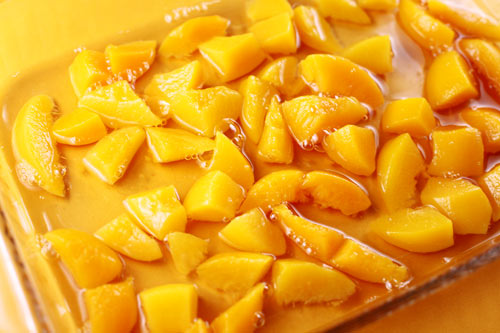
Cut the peaches into smaller pieces and you can distribute them more evenly.

Next up, you need a yellow cake mix.

IMG_2378
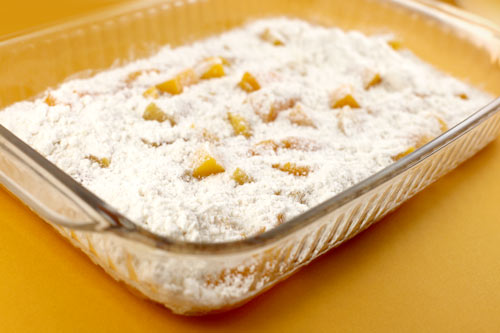
Sprinkle it right over the top of the peaches. No mixing. None.

Keep sprinkling until it’s all covered up.
IMG_2381
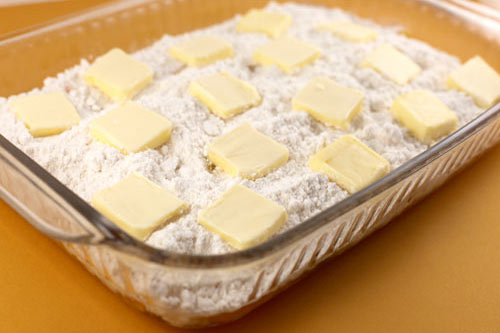
Then layer 1 stick of butter right on the top.
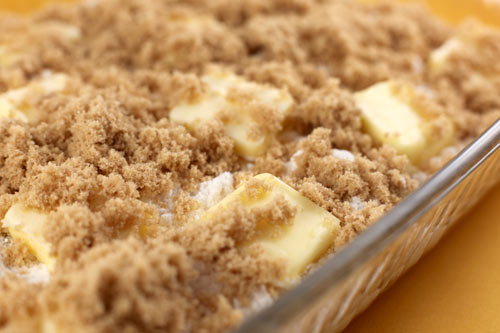
Next, add the brown sugar on top.
IMG_2390
Oh this is looking good. So fluffy. I need a spoon. No… I need to wait.
IMG_2402
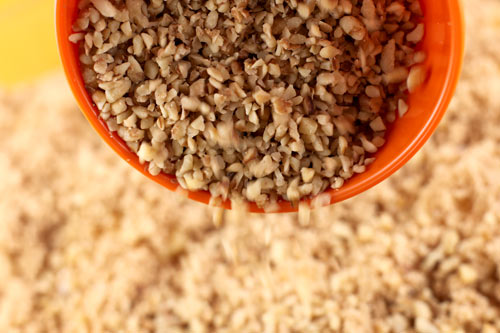
Finally, add some chopped walnuts. These are optional.

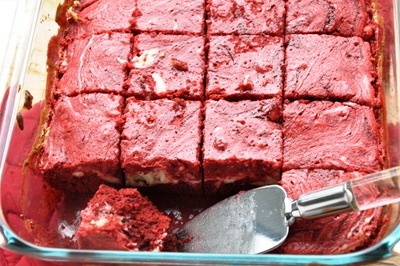
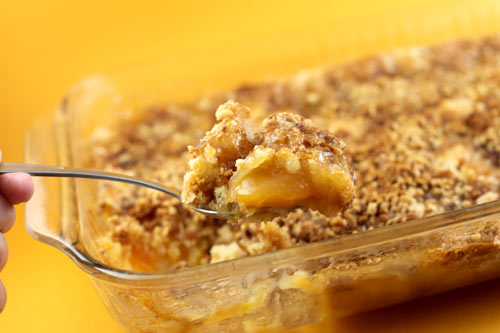
Bake it at 350 degrees for about 40 minutes and voila…
IMG_2433
Here is the recipe:

Peach Crunch Cake

24.5 oz jar of sliced peaches in light syrup

1 package yellow cake mix

1 stick butter (1/2 cup), cut into 16 pieces

1 cup brown sugar

1/2 cup chopped walnuts

Preheat oven to 350 degrees F.

Layer ingredients in a 13 X 9 dish, in order starting with the peaches.

Bake for about 40 minutes.

Serve warm or cold… with or without ice cream

Friday, August 03, 2012

I am going to make this!!!!

Yes!!! I plan to make this recipe this weekend!! I just can't wait!! I love red velvet!! I love cream cheese!! And I love brownies!!!

I saw this on Pinterest and went to the website that had the recipe: Honey What's Cooking


APPROXIMATE NUTRITION PER SERVING (yields 16 squares)

Calories: 192 cals
Fat: 11.3 g
Saturated Fat: 6.9 g
Carbs: 21 g
Protein: 2.9 g
Fiber: 0.25 g

RED VELVET SWIRL BROWNIES (adapted from Sunny Anderson)
~ yields 16 squares @ 350 degrees using a 8" x 8" baking tray
~ fat and calories were not reduced in this recipe.

INGREDIENTS:

Unsalted Butter – 8 tbsp (1 stick) – melted
Sugar – 1 cup
Vanilla Extract – 1 tsp
Ghirardelli Unsweetened Cocoa Powder – 1/4 cup
Pinch of salt
Red Food Coloring – 1 tbsp
Vinegar – 1/2 tsp (original recipe is 1 tsp)
Eggs – 2
All Purpose Flour – 3/4 cup

Cream Cheese Layer:

Cream Cheese – 8 ounces (softened)
Sugar – 1/4 cup
Egg – 1
Vanilla Extract – 1/8 tsp

DIRECTIONS for Brownie Layer:

1. Preheat the oven to 350 degrees and grease a baking tray.

2. Melt a stick of butter.
3. Once melted, add it to a mixing bowl.

4. Add sugar and vanilla extract. Blend until combined.

5. Add cocoa powder, pinch of salt, red food coloring, and vinegar.

6. Blend until well combined.

7. Add the blended eggs and combine until well incorporated.

8. Add the white flour.

9. Gently fold flour into batter.

10. Pour 3/4 of the batter into the prepared pan and reserve a 1/4 batter for later.

DIRECTIONS for Cream Cheese Layer:
11. In a separate bowl combine the cream cheese, 1 egg, sugar, and vanilla extract.

12. Blend until smooth and creamy.

13. Add the cream cheese layer over the brownie mixture.

14. Spread.

15. Add the remaining red velvet batter.

16. Swirl.

17. Into the oven for 30 minutes exactly – DO NOT OVERBAKE.

18. This is what you should have.

19. Cut into 16 squares. Refrigerate before serving - it tastes much better if you do.

red velvet 036


Wednesday, August 01, 2012

Isn't This Just Beautiful!!!


I saw this picture on Facebook and just has to share it! A weatherman in Florida described it: "Steve Weagle says "It's called iridescence. It is caused by sunlight refracting through ice crystals." They say that it occurred this past Tuesday in Florida
.


Ormond by the Sea
FL

Iridescent clouds contain small water droplets of similar sizes diffracting the sunlight to produce various colors. 
These photos were taken shortly after 7pm facing west, with the direct light of the sun blocked by lower dark clouds. 

I just had to get more information on these iridescence clouds, so here goes...

Iridescent Clouds

August 16, 2011
Manila_iridescenceIMG_0870-1200 (2)
IrisationNH
Photographer: Randell Teodoro (top); David Lee Tiller (bottom); David's Web site
Summary AuthorsDavid Lee TillerRandell TeodoroJim Foster

The photos above show examples of iridescence in mid-level clouds. Iridescence or irisation occurs in clouds composed on water droplets having similar sizes. They're most frequently observed in altocumulus or altostratustype clouds -- in clouds not undergoing substantial vertical growth. Diffraction processes are responsible for their formation and their metallic coloration. Note that the reds are found on the outside of the blues.

Midday iridescence can be spotted more readily if you're wearing sunglasses. However, always use extreme cautionwhen looking near the Sun. Roof peaks were used in both pictures to block out the Sun. Top photo taken on June 13, 2011 from Manila, The Philippines. Bottom photo taken on July 9, 2011 from Nashua, New Hampshire, U.S.

Monday, July 30, 2012

Did you miss me?

Hi! Sorry I haven't been posting much but I have been busy! Ordinarily, we only camp 3 times a year - not because we wouldn't want to camp but we didn't have anyone to camp with. This year has been different in that we found people to camp with! Yeh! Our 2 daughters but hybrid campers and a friend bought a travel trailer, plus we reconnected with neighbors who camp.

So far we have camped at Roundtop Campground in Gettysburg (that was a HOT weekend), Steamboat Landing in Lewes Delaware (hot weekend but my son has a seasonal site and a screen room attached to his 5th wheel which kept it cooler), and Artillery Ridge Campground in Gettysburg (HOT+++ and our air conditioner kept shutting off). We had fun at those campgrounds but were hot.

This past weekend we went to Mountain Creek Campground in Gardners, PA. Our sites were large and right on the creek. The children went tubing down the creek right in front of our sites. There were large shade trees on our sites that kept it cooler. I believe this camping trip was the most fun!

We ate the usual hot dogs, hamburgers, and chipped beef gravy. We also tried a shredded chicken in barbeque sauce that we put on top of baked potatoes - delicious and it all was done in crockpots! Another new dish was made over the fire. We used the piemakers. The ingredients were grilled chicken, red & green peppers, cheese, taco seasoning, and a little bit of water. A soft taco shell was put on the piemaker, then all the ingredients, and another soft taco shell. Close the piemaker and place in the fire. You have to keep checking but it takes about 5 to 8 minutes until they are done. Delicious!

So far we will be camping at a streetrod show Labor Day weekend and camping at Artillery Ridge for Halloween. We have also been talking about going to Harpers Ferry, WV the beginning of October. Can't wait!

Saturday, July 14, 2012

Guess What???


I just had to tell you how I spent my Saturday evening. The picture above is from Google - I didn't take a picture of my dish, sorry, it didn't last long enough.

So I am making myself some fresh sliced peaches and blueberries to eat and decide to put some whipped cream on top ...just a dab ;-) . My St. Bernard, Marcy, gets all excited when she sees food and was jumping around, doing a dance, breathing heavy, and making crazy sounds. She is not Cujo - she just loves food! 

So I squirted some whipped cream on my fruit and then s-l-o-w-l-y turned around, pointing it at Marcy. She opened her mouth wide and I squirted whipped cream right in her mouth (great aim!) and she slurped it right down. Now she won't leave me alone! She wants more whipped cream. I tested her so that I would be sure it was the whipped cream that she liked. I took out the whipped cream from the frig again - whoa and behold - Marcy opened her mouth wide (and that is a big mouth!). So I squirted her again and guess what - she slurped it down again and then was looking for more.

Yep! That is the highlight of my Saturday night! How was your Saturday night?

Thursday, July 12, 2012

Guess You Are Wondering What I have been Doing . . . or maybe not . . .

Guess you all are wondering what happened to me and why I haven't been posting. Well, let me tell you about what's going on.

First, I must say that I am not a "summer person". Heat does not wear well on me. And it has been hot in Hanover, PA this summer. We have an older motorhome that we go camping with or my husband takes it when drag racing his cars. My husband does complain that we have no one to camp with (sorry about ending a sentence with a preposition). This summer we found people to camp with!

So in May my daughter bought a new hybrid camper. It looks like this:


The ends of the camper are the beds. By the way these children are some of our grandchildren except for Jeremy. From left to right: Matthew (only grandson), Jeremy, Olivia, Kierra, Ariana, and Meagan. So now you see the camper and the grandchildren. Anyway, my daughter wanted us to go with them on their first camping trip with their new camper just in case they were unsure how to operate the camper. We went to Round Top Campground in Gettysburg, PA. Here is their link: Round Top Campground.

So we went with them on Memorial Day Weekend. The campground is very nice. It has a nice pool and activities for the adults and the children. It just so happened that they had some reenactors camping there that weekend. They had an activity that cost $2 where you could have someone arrested by the reenactors. Of course my grandson (who just loves his sisters), wanted to have his sister (Meagan) and Ariana (his step cousin - is that a word?) arrested. The reenactors came to the campsite, with guns, to arrest them. At first the girls did not want to go along with it but they gave in. Olivia was very upset that her sister, Meagan, was arrested. She cried and cried but stayed at the campground with me so she could eat! She eventually calmed down.


Afterwards, they did admit they had fun. Matthew was snickering the whole time!! He loved it.


One more thing - it was over 100 degrees at the campground!!! Yes it was hot!! We had taken our two dogs with us - Muffin (a Polish Lowland Sheepdog) and Marcy (a St. Bernard). They did not do well in the heat (nor did I) and we had to take them home Saturday night. The house was air conditioned which made them happy. We made trips home to feed them and let them out. They recovered from the heat and are lively as ever!


And as for me... it was hot and I sweated profusely! Maybe I should have said "perspired" but all I know there was watering pouring down my face all the time. The heat and humidity did a number on me and everyone else, but . . . it was all worth it to go camping with my daughter, son-in-law, and grandchildren! And of course, my husband ;-).


Wednesday, June 27, 2012

ReMake disposable plastic bags into fused placemats!

What a great idea! I have all those plastic bags from the grocery store that could be put to good use! I can't wait to make these placemats!

tiffany_threadgould_fused_placemats.jpg
Here is the video:


D-I-Y > Plastic bag placemat

description: Dress up your dining room by turning disposable plastic bags into reusable
placemats. Here you'll learn how to heat-fuse plastic bags together. Then simply cut
out a rectangle and you have a new table setting.

If you’re like me and turn down plastic bags at the checkout counter, ask your friends
and family to start collecting. Once you get the hang of heat-fusing, you can apply
this technique to a wide range of projects. Create coasters, reusable tote bags, pencil
cases and more. Your only limit will be your collection of plastic bags!

materials:
- 3 plastic bags
- a ruler
- a pen
- a pair of scissors
- 2 sheets of kraft paper
- an iron

instructions:
1. Measure and cut ¼ inch off the bottom of each plastic bag.

2. Turn the bags inside out and stack them on top of each other. Place the stack of bags
on one large piece of wax or parchment paper and cover the stack with another large piece
of wax or parchment paper. Place this entire stack on the ironing board.

3. Set your iron to medium heat (the rayon or polyester setting). Do a test: iron one corner
of your stack of bags to make sure they don’t burn. If they do, turn the iron down. Once
you have the correct setting, slowly run the iron over the top of your paper, always keeping
 the iron moving. Run the iron over the bags several times, but never touch the hot iron
directly to the plastic. This technique fuses the plastic bags together so they become a
solid piece of plastic. Turn off your iron and set it aside.

4. Take the fused plastic bags out from the layers of wax or parchment paper. Using a ruler,
mark and cut out a rectangle on the fused plastic that is 17 inches x 11 inches. Wipe off any
 marker you can still see. Round the corners with your scissors. Make as many placemats as
you’d like. Then, serve on these ReMade placemats at your next meal.


Here is the link: RePlayGround


Wednesday, June 13, 2012

Uncle Lou's Visit to Maryland

My Mom's brother, Lou Dlabick, or Uncle Dziusiu as we all know him, came to Maryland this Sunday with his son and his son's family to visit his family in Maryland and Pennsylvania. He will be here until Saturday morning when they will drive back to Ohio where the uncle lives. On Sunday, Jimmy (the son and our cousin) and his family will drive back to Missouri. I have included some pictures that we took so far and will add more later.

This is my Uncle Lou with his older sister, Aunt Stella. Lou will be 86 in December and Aunt Stella will be 93 in November. Lou is getting around great and is just so positive and happy. He says that he may not be rich in money but he is so rich in the love of family. He makes you everyone feel so happy and loved by just being around him!  Aunt Stella is walking with a cane - not because she needs to use it to walk but just in case she needs to hit someone in self defense. She has a great memory and relates all kinds of stories from the past to anyone who will listen, and even to those who don't want to listen ;-).


This is a picture of Uncle Lou holding a picture of his sisters and himself taken some years back. My Mom and Aunt Mary have passed away but Aunt Wanda, Aunt Stella, and Uncle Lou are still going strong.

One more thing - Uncle Lou is on Facebook! I think that is so great!

Wednesday, June 06, 2012

Calvin Nicholls Paper sculpture artist


A friend sent me pictures of Calvin Nicholls paper sculptures and I was just amazed!! Here is more information that describes what Calvin does. I have also included some pictures of his work.


"Calvin has been creating his paper sculptures since 1986 from his studio north of Toronto Ontario, Canada. Working with sheets of paper and a scalpel, he cuts the component pieces to fit the final drawing and assembles the low relief artwork under studio lighting. When the sculpture is complete the lighting is adjusted to bring out the subtle form and texture. A large format camera is used to capture the detail on 8x10 film prior to scanning for print applications or art prints."


Here is the link Calvin Nicholls provided by Behance if you want to see more of his work.