Wednesday, June 27, 2012

ReMake disposable plastic bags into fused placemats!

What a great idea! I have all those plastic bags from the grocery store that could be put to good use! I can't wait to make these placemats!

tiffany_threadgould_fused_placemats.jpg
Here is the video:


D-I-Y > Plastic bag placemat

description: Dress up your dining room by turning disposable plastic bags into reusable
placemats. Here you'll learn how to heat-fuse plastic bags together. Then simply cut
out a rectangle and you have a new table setting.

If you’re like me and turn down plastic bags at the checkout counter, ask your friends
and family to start collecting. Once you get the hang of heat-fusing, you can apply
this technique to a wide range of projects. Create coasters, reusable tote bags, pencil
cases and more. Your only limit will be your collection of plastic bags!

materials:
- 3 plastic bags
- a ruler
- a pen
- a pair of scissors
- 2 sheets of kraft paper
- an iron

instructions:
1. Measure and cut ¼ inch off the bottom of each plastic bag.

2. Turn the bags inside out and stack them on top of each other. Place the stack of bags
on one large piece of wax or parchment paper and cover the stack with another large piece
of wax or parchment paper. Place this entire stack on the ironing board.

3. Set your iron to medium heat (the rayon or polyester setting). Do a test: iron one corner
of your stack of bags to make sure they don’t burn. If they do, turn the iron down. Once
you have the correct setting, slowly run the iron over the top of your paper, always keeping
 the iron moving. Run the iron over the bags several times, but never touch the hot iron
directly to the plastic. This technique fuses the plastic bags together so they become a
solid piece of plastic. Turn off your iron and set it aside.

4. Take the fused plastic bags out from the layers of wax or parchment paper. Using a ruler,
mark and cut out a rectangle on the fused plastic that is 17 inches x 11 inches. Wipe off any
 marker you can still see. Round the corners with your scissors. Make as many placemats as
you’d like. Then, serve on these ReMade placemats at your next meal.


Here is the link: RePlayGround


Wednesday, June 13, 2012

Uncle Lou's Visit to Maryland

My Mom's brother, Lou Dlabick, or Uncle Dziusiu as we all know him, came to Maryland this Sunday with his son and his son's family to visit his family in Maryland and Pennsylvania. He will be here until Saturday morning when they will drive back to Ohio where the uncle lives. On Sunday, Jimmy (the son and our cousin) and his family will drive back to Missouri. I have included some pictures that we took so far and will add more later.

This is my Uncle Lou with his older sister, Aunt Stella. Lou will be 86 in December and Aunt Stella will be 93 in November. Lou is getting around great and is just so positive and happy. He says that he may not be rich in money but he is so rich in the love of family. He makes you everyone feel so happy and loved by just being around him!  Aunt Stella is walking with a cane - not because she needs to use it to walk but just in case she needs to hit someone in self defense. She has a great memory and relates all kinds of stories from the past to anyone who will listen, and even to those who don't want to listen ;-).


This is a picture of Uncle Lou holding a picture of his sisters and himself taken some years back. My Mom and Aunt Mary have passed away but Aunt Wanda, Aunt Stella, and Uncle Lou are still going strong.

One more thing - Uncle Lou is on Facebook! I think that is so great!

Wednesday, June 06, 2012

Calvin Nicholls Paper sculpture artist


A friend sent me pictures of Calvin Nicholls paper sculptures and I was just amazed!! Here is more information that describes what Calvin does. I have also included some pictures of his work.


"Calvin has been creating his paper sculptures since 1986 from his studio north of Toronto Ontario, Canada. Working with sheets of paper and a scalpel, he cuts the component pieces to fit the final drawing and assembles the low relief artwork under studio lighting. When the sculpture is complete the lighting is adjusted to bring out the subtle form and texture. A large format camera is used to capture the detail on 8x10 film prior to scanning for print applications or art prints."


Here is the link Calvin Nicholls provided by Behance if you want to see more of his work. 

Friday, May 25, 2012

Memorial Day ... take the time to remember

While everyone is busy with picnics, parades, the beach, vacations, and cookouts, take the time to remember all the people who have sacrificed their lives for our freedom. Remember their families who grieve and go on without their loved ones. Take the time to think about them and say a prayer for them and their families. And say a prayer of "Thanks!".


Thursday, May 24, 2012

5-minute cream cheese danish


I have tried the cream cheese danishes with the crescent rolls and they turned out very good! Now here is a recipe that looks special and like a danish should look.

If you have a can of crescent rolls and a package of cream cheese, you're in business.

Recipe after the jump!

Firstly, preheat your oven to 375 degrees (190 Cesius, for my Canadian friends) and line a cookie sheet with foil. Then, dump your ingredients into a mixing bowl.

8 oz cream cheese (softened)
1/2 c. powdered sugar
1 egg
pinch of salt

Mix these until they're smooth; set aside. Open your fridge and grab your can of rolls.

Unroll your cresent rolls onto a sheet of wax paper, but don't separate them. Pinch the seams together, like so:

Use a small, sharp knife to score the edges like I've shown here:

Don't fill it too full, just use about 80% of your filling.
Then fold the bottom part of the dough up and tuck it around the filling.

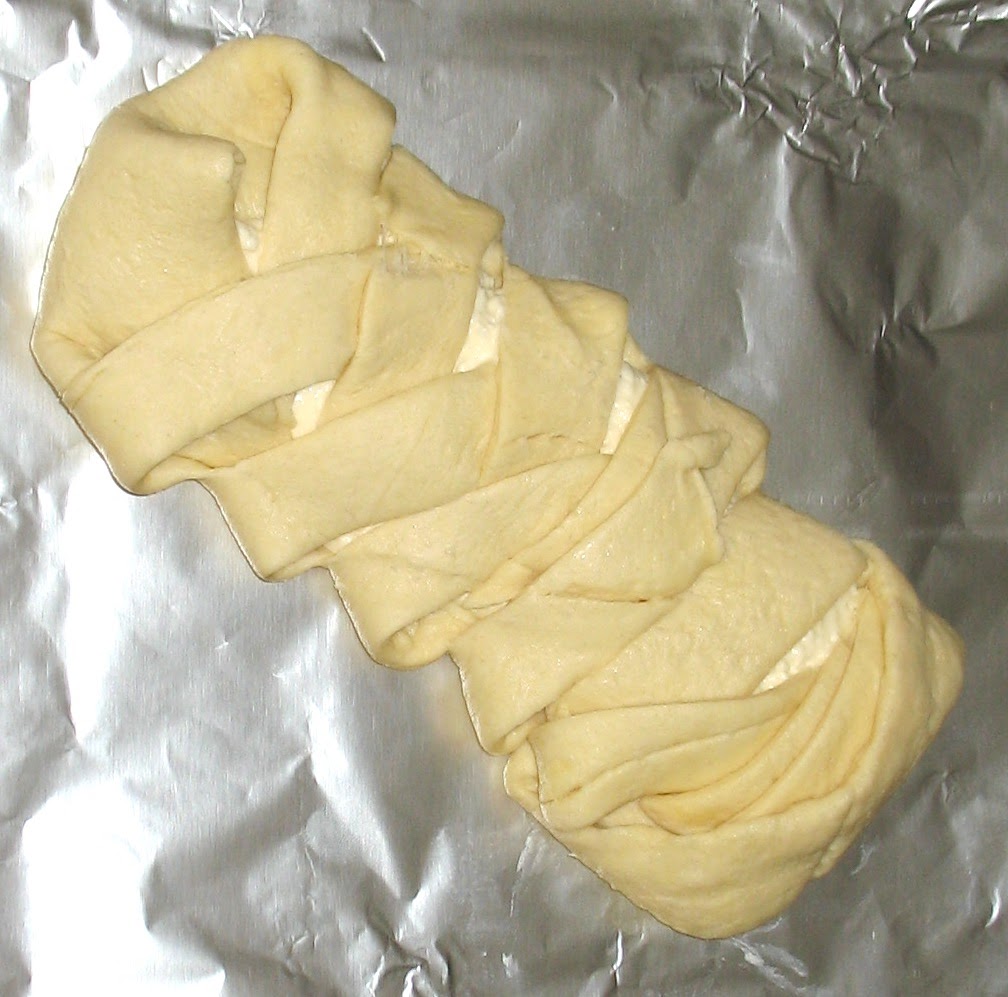
Begin "braiding" your dough, crossing one little flap over on one side, then the other, until you've gotten to the top. Fold the top of the dough over and tuck it around the other end of the filling. Carefully place your danish on your foil lined cookie sheet.

Bake at 375 for 15 minutes or so. While this is cooking, make your glaze.

1/2 c. powdered sugar
1/2 tsp. vanilla extract
1 TB milk

Whisk these together in a small bowl until smooth.

Left the foil with the danish on it from your cookie sheet and let it cool on a wire rack. This prevents the bottom of the danish from continuing to cook on the hot pan.

When it's cooled a bit, drizzle your glaze over it. Serve it for brunch and blow everybody's mind.


I found the recipe at : Crafty Butt Blog

Alex's Mocha Melted Ice-Cream Cake with Chocolate Marshmallow Frosting

Looks like I am taking an interest in recipes ;-), especially deserts! This just looked so good!!


Incredible Melted Ice-Cream Cake
by Anne Byrn

1 package (18.25 ounces) plain white cake mix (one without pudding in the mix!)
2 cups melted ice cream, your choice of flavor (I used Häagen-Dazs coffee)
1 tablespoon instant coffee or espresso powder
3 large eggs
2/3 cup mini chocolate chips
Chocolate Marshmallow Frosting (see below)

Place a rack in the center of the oven and preheat the oven to 350F. Lightly mist a 12-cup Bundt pan with vegetable oil spray, then dust with flour. Shake out the excess flour. Set the pan aside. (Or just use Pam with Flour - I love this stuff!)

Place the cake mix, melted ice cream, instant coffee, and eggs in a large mixing bowl. Blend with an electric mixer on low speed for 1 minute. Stop the machine and scrape down the sides of the bowl with the rubber spatula. Increase the mixer speed to medium and beat 2 minutes more, scraping the sides down again if needed. The batter should look thick and well blended. Add chocolate chips and mix just until it's best combined. Pour the batter into the prepared pan, smoothing the top with the rubber spatula. Place the pan in the oven.

Bake the cake until it springs back when lightly pressed with your finger and just starts to pull away from the sides of the pan, 38 to 42 minutes. Remove the pan from the oven and place it on a wire rack to cool for 20 minutes. Run a long, sharp knife around the edge of the cake and invert it onto a small rack, then invert it again onto a second rack so that the cake is right side up to complete cooling, 30 minutes more.

Meanwhile prepare the Chocolate Marshmallow Frosting: Slide the cake onto a serving platter and pour the warm frosting over the cake (you will have a little extra). Let it stand for at least 10 minutes before serving. 

Marshmallow Frosting
2 cups confectioners' sugar
1/2 cup unsweetened cocoa powder
6 large marshmallows or 3/4 cup marshmallow fluff
4 tablespoons (1/2 stick) butter
1/4 cup whole milk or whipping cream
1 teaspoon pure vanilla extract

Sift the sugar and cocoa powder together into a large mixing bowl.

Set aside. Place the marshmallows, butter, and milk/cream in a medium-size heavy saucepan over low heat. Stir until the marshmallows are melted, 2 to 3 minutes. Remove the pan from the heat. Pour the confectioners' sugar and cocoa mixture over the marshmallow mixture. Add the vanilla and stir until the frosting is smooth and satiny.

Use at once to frost the top of the cake of your choice.For the garnish, I used marshmallow fluff to "glue" on chocolate covered coffee beans.


Tuesday, May 22, 2012

Creamy Orange Cake

When I saw the picture of this cake, I just knew that I wanted to make it! It is a great cake to make in the summertime! Orange just seems so refreshing. I can't wait to make it!


Ingredients
1 (18.25 ounce) package orange cake mix
1 (3 ounce) package orange flavored gelatin mix
1 cup boiling water
1 (3.4 ounce) package instant vanilla pudding mix
1 cup milk
1 teaspoon vanilla extract
1 teaspoon orange extract
1 (8 ounce) container frozen whipped topping, thawed

Directions
  • Prepare and bake cake mix according to package Directions for a 9x13 inch pan. Poke holes in cake while still hot with the round handle of a wooden spoon.
  • In a medium bowl, make gelatin with only 1 cup of boiling water. Pour liquid gelatin over cake while hot. Cool cake completely.
  • In a medium bowl, make vanilla instant pudding with only 1 cup of milk. Stir in vanilla and orange extract. Fold in whipped topping. Spread evenly over cake. Refrigerate cake for 1 hour before serving.
Here is the link: Tricks Chefs Site

Saturday, May 12, 2012

Happy Mother's Day!!!


Just wanted to say Happy Mother's Day to all mothers. Some of you have had children, some would like to have children, some adopt children, some are in the process of having children, some of you appreciate and love children as if they are your own. I just wanted to say "Thank You!" to all of you. 


And there are some of you who miss your mothers who have passed. Just know that she will always love you and she sends a great big hug to you. 


Have a great day!

How-To: Print on Fabric with an Inkjet Printer


I saw this today and just had to copy it so you could see it. I have always wondered how I could make my own fabric designs and this tutorial will instruct you on using an ink jet printer. I want to try it so my fabric can be unique! How about you?


About Ink
Printing your own fabric is not as difficult as it sounds, and you don't need any special equipment to get started. The only secret to a successful print is to make sure that you have the right type of ink. Cheap printer cartridges and refills often use a dye-based ink that colors unpredictably on fabric, and may even wash out completely in water.

More expensive printer cartridges use pigment ink. Pigment ink is colorfast on many different surfaces, and is much more useful for printing on fabric.

Unfortunately, finding out if you have pigment ink or dye is not always straightforward. Your printer manual is a good place to start, and a physical examination of the ink should settle the matter beyond doubt. When the printer cartridges need changing, remove the yellow ink and place some on a piece of glass. Yellow pigment ink will be vibrant but opaque, while yellow dye will be transparent and almost brown in color.

Disclaimer: Not all printers can print on fabric, and putting fabric through your printer could damage it permanently. This is an experimental technique, and you should only try it if you understand that it involves an element of risk.

Materials

Light-colored fabric
Printer that uses pigment inks
Scissors
Card
Sticky tape

Directions


Fabric Printing Step1
Step 1: Choose a light-colored, flat fabric, and cut it to the maximum width that your printer can handle. I have an Epson R1800, so it can take just over A3+ width of fabric. If your printer supports printing from a roll, then you can make the fabric as long as you like. Otherwise you will need to cut the fabric into sheets. If you are using a long length of fabric, you might want to roll it onto a cardboard tube to make it more manageable.
Fabric Printing Step2

Step 2: Take a piece of card the same width as the fabric and fix the end of fabric to the card using sticky tape. The card works like a leader, giving the printer something to hold onto when you first start printing. I use a piece of card about 10" long, and tape the fabric about 2" in from the end. Once the card is through the printer, the weight will help keep the fabric running smoothly.

Step 3: Feed the card into the printer. On the Epson R1800, I use the roll feed to accept the paper, because the paper enters the printer at a more shallow angle and also because I can print unlimited lengths using the banner mode of the printer.

Fabric Printing Step4
Step 4: Create your design on the computer, and then print it out. Keep a constant eye on the printer while it is running, and watch that the fabric doesn't get creased or jam up the head. If you do have a problem, turn the printer off at the wall and clear the fabric manually before restoring power. Do not pull or move the fabric while it is still being printed. Slight changes in fabric tension can make your design distort, and increase the chance of creases forming.
Fabric Printing Step5

Step 5: You will need to fiddle around with the brightness / color settings on your printer to get the design looking right. Each fabric is slightly different, and experimentation is absolutely necessary if you want to get good results.

Step 6: When the printing is finished, you should leave your new custom fabric to dry for about an hour. You might find that some of the ink comes off on your hands when you first handle the fabric. This is normal, and is nothing to worry about. Simply rinse the fabric in warm water to remove any excess pigment, and then hang it out to dry
.
Fabric Printing End

Step 7: When the fabric is dry, iron the reverse side at low temperature. From this point onwards, the fabric can be treated just like shop-bought fabric. I recommend using a cool wash and ironing on the reverse side where possible to help preserve the colors.

This tutorial came from the Craft Blog

About the Author: Andrew Lewis is a journalist, a maker, an ardent victophile, and the founder of the www.upcraft.it blog. He is currently studying for a PhD. in archaeometrics and 3D scanning at the University of Wolverhampton.

Wednesday, May 09, 2012

Cucumber and Tomato Salad


This salad is just so good! And it is easy to make! This salad reminds me of the fresh vegetables of summer. Even though it has been a damp overcast kind of week, it brings the smell of summer to the house.
Cucumber and Tomato Salad
  • 3 medium sized cucumbers or 6 mini cucumbers (I used mini’s)
  • 1 (10.5 oz) container of grape tomatoes, halved
  • 1 medium red onion, finely diced
  • 6 sprigs of fresh dill (you can sub 1 tsp dill weed but fresh is best here)
  • 1 cup zesty Italian salad dressing
  • Salt and pepper to taste
  1. Quarter or halve the cucumbers depending on the size used, then slice into 1/4″ pieces.
  2. Place the cucumbers in a bowl and add the grapes, onion, and dill.
  3. Toss the cucumber mixture with the Italian dressing until evenly coated with salad dressing.  Add some salt and pepper to taste. Refrigerate for at least one hour before serving.  The longer the better.
Recipe adapted from Bluebonnets and Brownies.
I saw this recipe on Real Mom Kitchen Blog