Sunday, April 22, 2012

The Only Flag That Doesn't Fly

A friend sent me this picture and I was just so moved by it! I will not add anymore description except for the description included in her email.


Between the fields where the flag is planted, there are 9+ miles of flower
fields that go all the way to the ocean. The flowers are grown by seed
companies. It's a beautiful place, close to Vandenberg AFB. 

Check out the dimensions of the flag. The Floral Flag is 740 feet long and 390 feet wide and maintains the proper Flag dimensions, as described in Executive
Order #10834. This Flag is 6.65 acres and is the first Floral Flag to be
planted with 5 pointed Stars, comprised of White Larkspur. Each Star is
24 feet in diameter; each Stripe is 30 feet wide. This Flag is estimated to
contain more than 400,000 Larkspur plants, with 4-5 flower stems each,
for a total of more than 2 million flowers.

It's just beautiful!


Cordwood Home Design

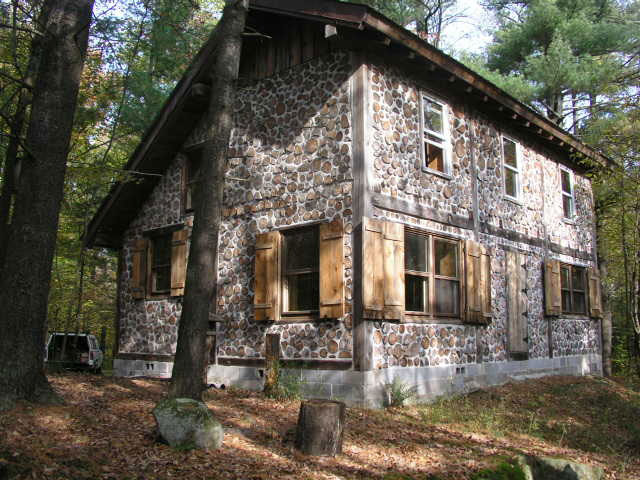
When I saw the story on cordwood home designs, it sparked my curiosity. This home is made of firewood logs. It is green and energy efficient!

A framework of heavy timbers supports the roof. Inside the timber framework, 16-inch long chunks of firewood are stacked to build the walls. This house is built with cedar, but tamarack, pine and poplar work well. Mortar holds the logs in place and foam insulation fills any voids in the middle.
Larger view

To save money, some builders use sawdust as insulation. The walls of a cordwood home have nearly twice the insulation value of a traditional home.
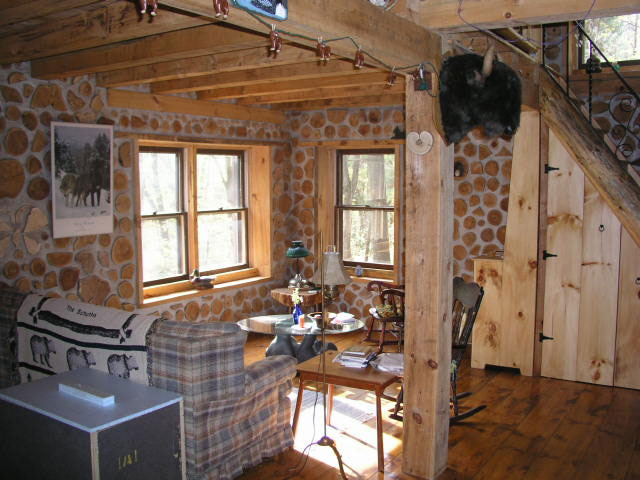
The ends of the logs are visible inside and outside, giving the house a distinctive look.

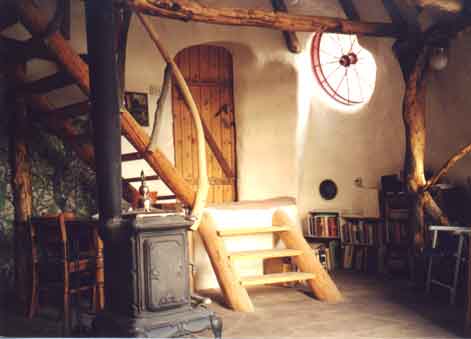
Glass bottles embedded in the walls bring beams of colored light into the living space. The wood chunks can be arranged in purposeful designs.
Rob Roy stated on the Green Home Building site: After studying the wide array of "natural building" techniques for several years, I have come to accept cordwood as one of the greenest of all: it uses what is often considered a waste material, creates an insulated wall that requires no further finishing or maintenance over time, and can be done by relative novices...what more could you want?"

As you can see below, the cordwood home is rustic, unique, and beautiful!


Thursday, April 19, 2012

Lemon Cake Recipe

This cake sounds so good and it is healthy!!! It uses a box cake mix (makes it faster). What more could you want?

Lemon Cake RecipePhoto by: Taste of HomeLemon Cake Recipe

Lemon Cake Recipe

Prep: 20 min. Bake: 25 min. + cooling
Yield: 15 Servings

Ingredients
  • 1 package (18-1/4 ounces) white cake mix
  • 1 package (3 ounces) lemon gelatin
  • 1 cup plus 2 tablespoons water
  • 4 egg whites
  • 1/3 cup unsweetened applesauce
  • 1 tablespoon canola oil
  • 1 teaspoon lemon extract
  • 4 drops yellow food coloring, optional
LEMON GLAZE:
  • 1-1/2 cups confectioners' sugar
  • 1/3 cup lemon juice
Directions
  • In a large bowl, combine the cake mix, gelatin, water, egg whites, applesauce, oil, lemon extract and food coloring if desired; beat on low speed for 30 seconds. Beat on medium for 2 minutes.
  • Pour into a 13-in. x 9-in. baking pan coated with cooking spray. Bake at 350° for 25-30 minutes or until edges are lightly browned and a toothpick inserted near the center comes out clean. Cool on a wire rack for 10 minutes.
  • Meanwhile, for glaze, in a small bowl, combine confectioners' sugar and lemon juice until smooth. Drizzle about a third of glaze over cake; carefully spread evenly. Repeat with remaining glaze. Cool completely. Yield: 15 servings.
Nutritional Analysis:1 piece equals 225 calories, 5 g fat (1 g saturated fat), 0 cholesterol, 266 mg sodium, 43 g carbohydrate, trace fiber, 3 g protein.

Originally published as Lemon Cake in Light & Tasty April/May 2005, p27

Wednesday, April 18, 2012

Nurta Eats Like a Cave Woman!: So last night I cracked a coconut...


A friend of mine has started a new way of eating (it's not a diet) called Paleo. She also started a blog to record her progress and help others to understand this way of eating, fondly referred to as eating like a cavewoman/caveman. In trying to find out about Paleo and what is different with using it rather than other eating methods, I came upon a site on Nurta's blog called whole9life  that provides an explanation. You can refer to this site: http://whole9life.com/2010/05/the-paleo-pitch/ for more information.

The Whole9 Nutrition Elevator Pitch

I eat “real” food – fresh, natural food like meat, vegetables and fruit. I choose foods that are nutrient dense, with lots of naturally-occurring vitamins and minerals, over foods that have more calories but less nutrition. And food quality is important – I’m careful about where my meat comes from, and buy produce locally and organically as often as possible.

It’s not a low calorie “diet” – I eat as much as I need to maintain strength, energy and a healthy weight. In fact, my diet is probably much higher in fat than you’d imagine. Fat isn’t the enemy – it’s a great energy source when it comes from high quality foods like avocado, coconut and nuts. And I’m not trying to do a “low carb” thing, but since I’m eating vegetables and fruits instead of bread, cereal and pasta, it just happens to work out that way.

Eating like this is good for maintaining a healthy metabolism, and reducing inflammation within the body. It’s been doing great things for my energy levels, body composition and performance in the gym. It also helps to minimize my risk for a whole host of lifestyle diseases and conditions, like diabetes, heart attack and stroke.


If you go to my friend, Nurta's, blog at http://paleonurta.blogspot.com, you can read her progress and insight. It does sound interesting. This is her most recent addition to her blog:

Nurta Eats Like a Cave Woman!: So last night I cracked a coconut...: No really it's easy. I'm sure for paleo man/woman it wasn't as simple as it was for me. I used a flathead screw driver, hammer, and a vegg...

Pineapple Upside Down Cake

Pineapple Upside Down Cake


I made this cake yesterday with a few modifications and it was just so good! I used a 13X9 glass cake pan. I used pineapple chunks - that way everyone gets some pineapple. Since I used a different pan, I did not bake it for 1 hour. After 35 minutes, a beautiful pineapple smell enticed me to look at how the cake was doing. It was getting brown on top, actually a dark brown, so I put a sheet of aluminum foil on top so it would not burn. I waited about 5-10 minutes longer, put a toothpick in the middle and took the cake out of the oven. The toothpick came out clean (it was done!) so I inverted the cake on a cookie pan. This cake was just so good! My husband ate so many pieces that I had to put it away. You just have to try it!

Here is the recipe from Duncan Hines :

Hands-On Time: 10 minutes
Total Time: 1 hour and 15 minutes
Servings: Makes 16 to 20 servings.
Rating: 5 stars

Ingredients:
Topping:

· 1/2 cup (1 stick) butter or margarine

· 1 cup firmly packed brown sugar

· 1 (20 oz) can pineapple slices

· Maraschino cherries

Cake:

· 1 pkg Duncan Hines® Moist Deluxe® Pineapple Supreme Cake Mix

· 1 (3.4 oz) pkg vanilla instant pudding and pie filling

· 4 large eggs

· 1 cup water

· 1/2 cup oil

Baking Instructions

1. Preheat oven to 350°F.

2. For topping, melt butter over low heat in 12-inch cast-iron skillet or skillet with oven-proof handle. Remove from heat. Stir in brown sugar. Spread to cover bottom of skillet. Arrange pineapple slices, Maraschino cherries and walnut halves in skillet. Set aside.

3. For cake, combine cake mix, pudding mix, eggs, water and oil in large mixing bowl. Beat at medium speed with electric mixer for 2 minutes. Pour batter evenly over fruit in skillet.

4. Bake at 350 ºF for 1 hour or until toothpick inserted in center comes out clean. Invert onto serving plate.

Copyright © 2012 Pinnacle Foods Corp. LLC. All Rights Reserved.

Sunday, April 15, 2012

Tiny Tip Tuesday: Growing Onions in Water

What a great idea! You can grow green onions in water and have a never ending supply!


Check out this tutorial on
Tiny Tip Tuesday: Growing Onions in Water

Friday, April 13, 2012

How to Whistle With Your Fingers


I saw this on the following site: The Art of Manliness. I have always wanted to be able to whistle with my fingers and was in awe of others who were able to do it.So when I saw these instructions, I got real excited! I have decided to try this - he says it is important to practice until you get it. I am willing to try - how about you?
Ever since I was a kid, I’ve wanted to know how to give a commanding whistle with my fingers in my mouth. You know. The kind you see people give in old movies when they’re hailing a taxi or trying to get the peanut guy’s attention at the ballpark. It just seemed like a cool skill to have. But alas, I’ve spent my entire young and adult life frustrated that I couldn’t uncover the secret to this age old trick.
Many of you out there reading the blog feel the same way. Believe it or not, covering how to whistle with your fingers has been one of our most requested articles. Most of the emailers shared how they had a grandpa or dad who knew how to give a loud, forceful whistle with their fingers (in my case, my mom was the master of this kind of whistle). Like me, they thought it was a cool skill, but one which unfortunately hadn’t been passed onto them.
So I finally made it a goal to once and for all figure out how to whistle with my fingers, so that I could create an AoM tutorial on the subject. After just forty minutes of annoying my wife with intense practice, I finally mastered the skill that had eluded me since I was eight years old. Achievement unlocked!
Below, I show how you too can whistle with your fingers.

Choose Your Finger Combination

Your fingers do two things that allow you to create an ear-piercingly loud whistle. First, they keep your tongue pushed back, and second, they keep your lips tucked back over your teeth. The pushed back tongue and tucked lips will create a bevel which will produce a tone when you blow.
There are a myriad of finger combinations you can use to get the desired effect. I’m going to show you my two favorites.
Two-Handed, Middle/Index Finger Combo
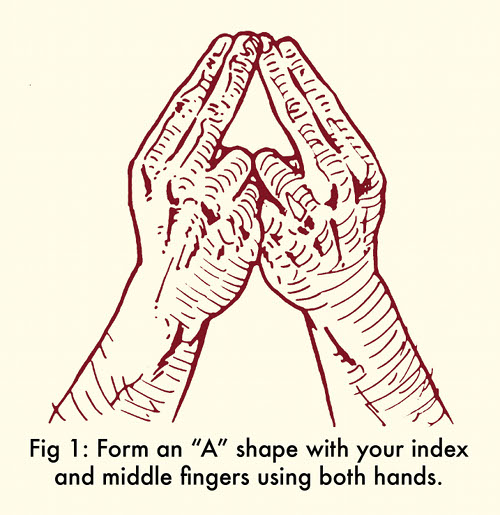
Extend your middle and index fingers on both hands, keeping them close together, while your thumbs hold down your ring and pinky fingers.
Place your two middle fingers together, forming an “A” shape. [See Fig. 1]
I feel like I get a louder and more forceful whistle using this finger combo.
One-handed, O.K. Sign 
This combo allows you to whistle with just one hand. All you need to do is form an “OK” sign with either your thumb and index finger or thumb and middle finger.

Wet and Tuck Your Lips Back Over Your Teeth

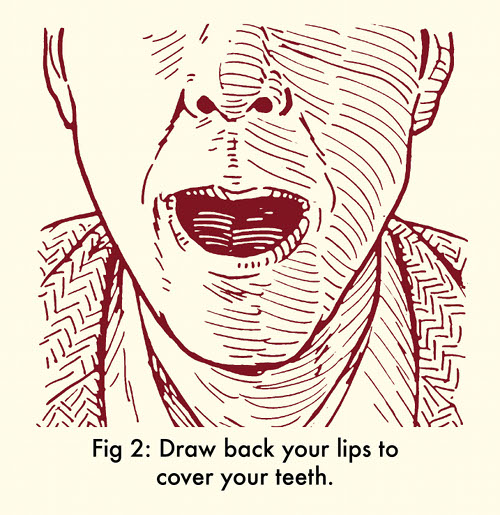
Lip placement is key. Give your lips a quick lick to wet your whistle. Tuck your lips back over your teeth. It’s what you do when you pretend you’re an old man without any teeth. Your lips need to cover your teeth in order to whistle successfully. [See Fig 2.] Feel free to adjust how much or little you tuck your lips back. It’s going to vary from person to person.
Your fingers will help keep your bottom lip tucked over your teeth.

Push Tongue Back Into Mouth With Fingers

This step is master key of successfully whistling with your fingers and also the trickiest to get right. It was for me at least.
Some people say you just need to push your tongue back in your mouth with your fingers. That advice was a bit too vague for me.
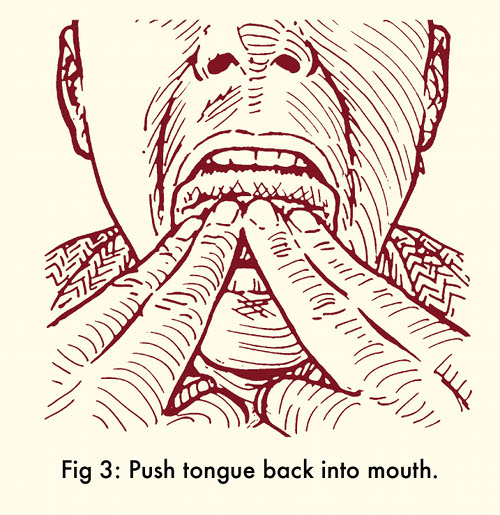
What worked for me was folding the tip of my tongue back on itself and holding it in place with my fingers, as you see in Fig. 3. Here’s how to do it with the two-handed, middle/index finger combo.
  • Place the tip of your fingers underneath your tongue right at the tip.
  • Push the tip of your tongue back with your fingers. You’re basically folding the first 1/4 of your tongue back on itself.
  • Push your tongue back into your mouth until your first knuckle reaches your bottom lips.
Same principles apply if you’re using the one-handed, O.K. sign combo.
Again, this method worked for me. Others do it a little differently–often pushing the tongue in without really folding it over. Experiment to find what works for you.

Blow

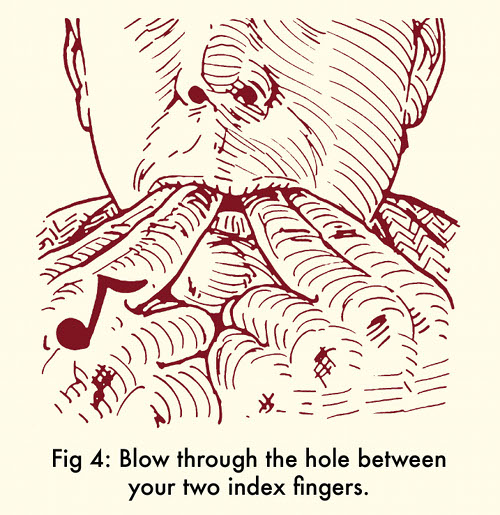
With your fingers in your mouth, keeping the tip of your tongue folded and lips tucked back over your teeth, close your mouth around your fingers. You want to make sure you have a complete seal around your fingers.
Here’s how it should look:
Give a soft blow out your mouth. You should feel the air only go out over your bottom lip. If you feel air coming out the sides of your mouth, close your mouth tighter around your fingers. Remember, perfect seal.
Make sure you don’t see your tongue make an appearance in the hole between your fingers! It’s blocking the air from coming out.
You probably won’t get a sound right off the bat. That’s okay. Adjust your finger placement under your tongue and experiment with different finger angles and varying degrees of lip tuckage until you find the sweet spot. Experimentation is key–keep making little adjustments. You’ll know when you’re getting close to your whistle sweet spot because you’ll start producing a noise that sounds sort of like you’re blowing over a beer bottle. Start blowing more forcefully, until you get that high-pitched and loud whistle.
A word of warning: make sure to take a break between blows when you’re first starting out. I’m not kidding. If you keep blowing and blowing, you’ll just hyperventilate, make yourself feel lightheaded and dizzy, and give yourself a headache.

Practice

Keep practicing until you get it. I was able to get it down after 40 minutes of dedicated practice broken up over two days. If you’re married or live with other people, go outside or in a room to avoid driving your loved ones insane. A good time to practice is when you’re stopped at traffic lights while driving alone. Once you figure it out, you’ll wonder why it took you so long to master this awesome skill!

Thursday, April 12, 2012

Vintage Baby Quilt


Vintage Baby Quilt by YoYo Mama. 

I saw this easy baby quilt on the Ingrid Barlow Site and thought "Well, that's a great idea!". I am always looking for an easy way to do things. I also thought that maybe I could just put appliques on it. So many ideas - so little time! 

This is what Ingrid had to say: "You simply place your little squares on top of another piece of fabric + batting + backing, and you sew down the edges.  Throw it in the wash and poof!  There you have it.  This is a good one for all you wanna be quilters.  No piecing involved!".

Tuesday, April 03, 2012

FLORIANI HEAT N SHRINK AND FREE-MOTION QUILTING

\


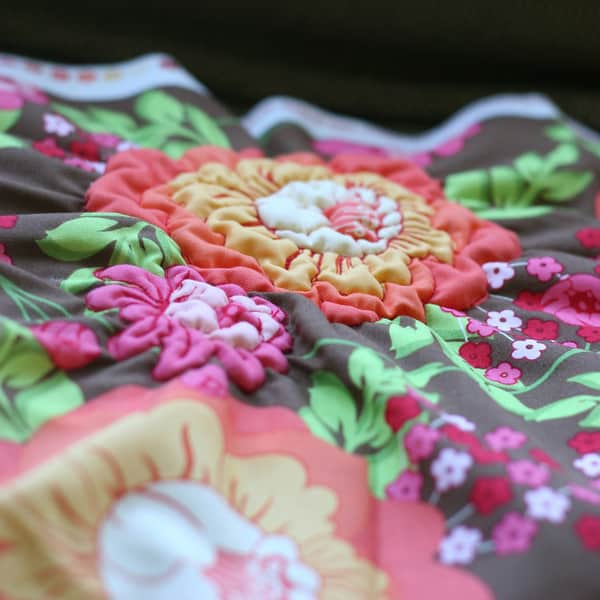
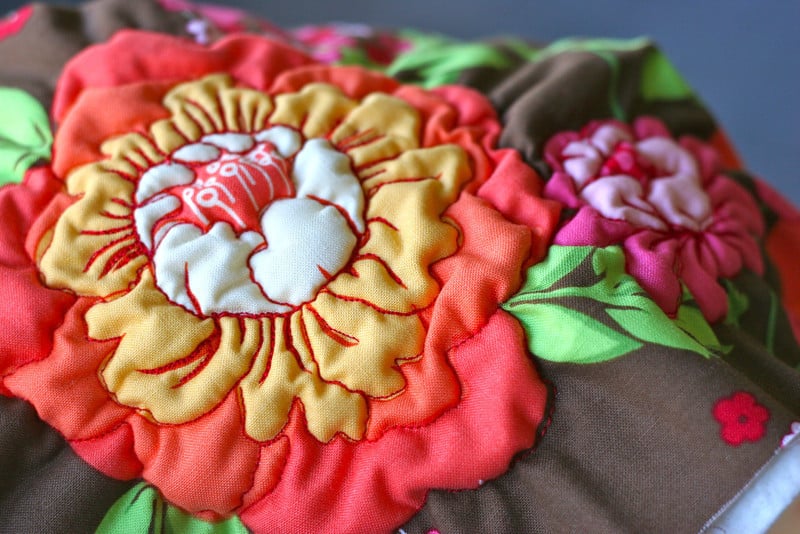
This is so neat! You take a fabric that has flowers or any shape that you want to make puffy. You will use Floriani Heat N Shrink with some batting and sew the lines of the flower. Then you you steam it and it puckers up! The uses are endless - applique on a wall hanging, quilt, purse, or you can do the entire piece of flowered fabric and use it to make a child's dress or nightgown.


The directions come from the Prudent Baby site  and they are very clear to understand. This should be easy to make.


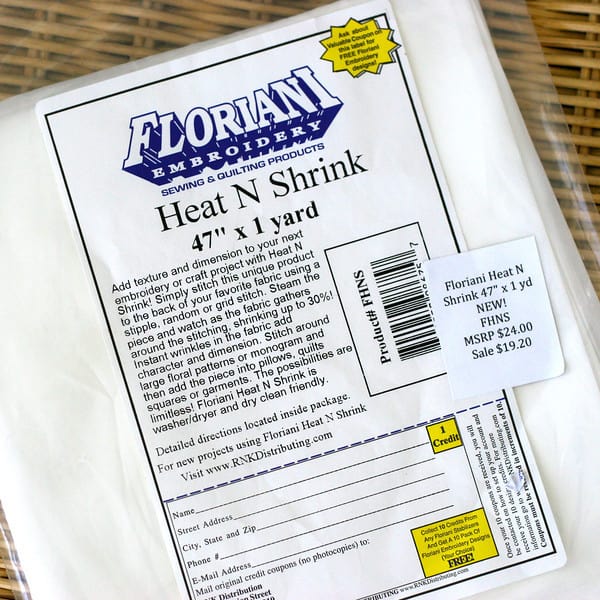
Above is the Heat N Shrink that was used and although a little pricey, it will last you for many designs. The site has additional pictures that you can see the difference in flowers that this method is used on and other flat flowers. 
Below is some of the directions that is on the site:
  • I cut a square the size of the large flower in my Sandi Henderson Fabric. Then I layered a square of low-loft batting in-between the Heat N Shrink and the back of the fabric, pinning in place.(The batting is optional but does add a nice puff to the petals.) 
  • Next I attached my quilting foot and lowered my feed dogs so I could try some free-motion quilting around the edge of the flower. Then just stitch along every line of the design. It takes a little practice, mostly you have to remember to move your fabric by hand. 
  • Since your fabric will be all bunchy later, it doesn’t have to be perfect. 
  • You can stitch lines, grids, dots or any design


Monday, April 02, 2012

Color Me Quilty: Painting Quilts

I just love this idea of painting quilts! This quilter used Lumiere paints by Jaquard to paint the quilt. She said that the quilt shimmered in the light.


Can you imagine the different ways that you can use the paints on quilts?

She used the paints without any mixing, applied by a small paint brush. They covered amazingly well.
Here is more detail:


And here is the link:  Color Me Quilty