Showing posts with label DIY. Show all posts

Friday, August 10, 2012

DIY Fabric Floorcloth


Now this is a great idea! Do you want a floorcloth for your room that is like no other, any size you want, any design you want, and messes can be just wiped off??? Here you go. I saw this on East Coast Creative Blog

I love the endless possibilities! You can use it for a kitchen floor mat, a dog bowl mat (Oh, are they messy when drinking water!), an entrance mat that will welcome your friends (can't you just hear them say "Where did you get that beautiful mat?" ), a bathroom mat to match your curtains or towels, or even a runner that just takes your breath away? This is it!! You will even use the secret of DIY'ers everywhere - duct tape! Hooray!! I am so excited to try this!


Step 1: Gather your materials.
Fabric: the amount depends on the size of your mat. I used about 3/4 yard for my kitchen mat, and 1 1/2 yards for my entryway mat).

Rubber Mat Runner: I've seen similar floor mats made with vinyl flooring remnants (check out Diane's floor mat from In My Own Style!), but I wanted something sturdy with traction and this fit the bill! Found at Home Depot in the flooring section.


Spray Adhesive
Water-based Polyurethane
Scissors
Duct Tape


Step 2: Using your scissors, cut your rubber mat to size.
I wanted an octagonal shape for my kitchen so I measured the angles and then cut accordingly.

3. Measure and cut your fabric to size. Leave approximately 2-3 inches all the way around your rubber mat, because you'll be wrapping the fabric around it later. Don't forget to iron your fabric before moving to the next step! I used two different fabrics for two different mats. I had extra fabric from the pendant light I made for my kitchen. It's called Waverly Solar Flair in Lime & Indigo, and it's fabulous. I can't remember the name of the other fabric- sorry! But I love.them.to.pieces. (I realize that loving fabric that much is weird, but I'm OK with that)

4. Determine your fabric placement
. Then fold the fabric back about halfway and spray the rubber mat with spray adhesive. Fold the fabric back down, smoothing out the bubbles and wrinkles as you go. Lift the other side of fabric up and repeat that method. The fabric should stick well to the rubber mat.


5. Brush a water-based polyurethane on to your fabric. Make sure it's water-based so that your fabric doesn't yellow! This will seal your fabric and protect it from water. You'll also be able to wipe the mat down should anything spill on it (let's be honest, I wish I could poly every surface in my house for this reason). I did 3 coats of poly, letting it dry completely in between coats.
6. Once the final coat has dried, lay your mat fabric-side down on the ground. Begin folding the edges of the fabric towards the center of the rubber mat. Spray each edge with adhesive and press down until it sticks. Then take your duct tape and run it along the edges to create a seal. No one will see the underside of your mat and you'll want the extra security the duct table provides!

To create perfect corners, just follow these simple steps:
1. Grab the corner and fold up towards the center of the mat.
2. Fold one side up flush against the edge of the rubber mat to create a straight line.
3. Fold the opposite side up in the same way until both sides meet in the middle.
Once you've finished duct taping, you're done! Lay your floor cloth down and admire your handiwork. So easy, and so cute! Here's the one I made for the entryway (It's 4 feet by 2 feet, if you were wondering):


And the one for my kitchen:

Because this mat already has traction, it doesn't slide around really at all. However, if you wanted extra stay-put-ability, just run a line of caulk around the edges where the fabric is, and it will better grip the floor.


Wednesday, June 27, 2012

ReMake disposable plastic bags into fused placemats!

What a great idea! I have all those plastic bags from the grocery store that could be put to good use! I can't wait to make these placemats!

tiffany_threadgould_fused_placemats.jpg
Here is the video:


D-I-Y > Plastic bag placemat

description: Dress up your dining room by turning disposable plastic bags into reusable
placemats. Here you'll learn how to heat-fuse plastic bags together. Then simply cut
out a rectangle and you have a new table setting.

If you’re like me and turn down plastic bags at the checkout counter, ask your friends
and family to start collecting. Once you get the hang of heat-fusing, you can apply
this technique to a wide range of projects. Create coasters, reusable tote bags, pencil
cases and more. Your only limit will be your collection of plastic bags!

materials:
- 3 plastic bags
- a ruler
- a pen
- a pair of scissors
- 2 sheets of kraft paper
- an iron

instructions:
1. Measure and cut ¼ inch off the bottom of each plastic bag.

2. Turn the bags inside out and stack them on top of each other. Place the stack of bags
on one large piece of wax or parchment paper and cover the stack with another large piece
of wax or parchment paper. Place this entire stack on the ironing board.

3. Set your iron to medium heat (the rayon or polyester setting). Do a test: iron one corner
of your stack of bags to make sure they don’t burn. If they do, turn the iron down. Once
you have the correct setting, slowly run the iron over the top of your paper, always keeping
 the iron moving. Run the iron over the bags several times, but never touch the hot iron
directly to the plastic. This technique fuses the plastic bags together so they become a
solid piece of plastic. Turn off your iron and set it aside.

4. Take the fused plastic bags out from the layers of wax or parchment paper. Using a ruler,
mark and cut out a rectangle on the fused plastic that is 17 inches x 11 inches. Wipe off any
 marker you can still see. Round the corners with your scissors. Make as many placemats as
you’d like. Then, serve on these ReMade placemats at your next meal.


Here is the link: RePlayGround


Saturday, May 12, 2012

How-To: Print on Fabric with an Inkjet Printer


I saw this today and just had to copy it so you could see it. I have always wondered how I could make my own fabric designs and this tutorial will instruct you on using an ink jet printer. I want to try it so my fabric can be unique! How about you?


About Ink
Printing your own fabric is not as difficult as it sounds, and you don't need any special equipment to get started. The only secret to a successful print is to make sure that you have the right type of ink. Cheap printer cartridges and refills often use a dye-based ink that colors unpredictably on fabric, and may even wash out completely in water.

More expensive printer cartridges use pigment ink. Pigment ink is colorfast on many different surfaces, and is much more useful for printing on fabric.

Unfortunately, finding out if you have pigment ink or dye is not always straightforward. Your printer manual is a good place to start, and a physical examination of the ink should settle the matter beyond doubt. When the printer cartridges need changing, remove the yellow ink and place some on a piece of glass. Yellow pigment ink will be vibrant but opaque, while yellow dye will be transparent and almost brown in color.
Disclaimer: Not all printers can print on fabric, and putting fabric through your printer could damage it permanently. This is an experimental technique, and you should only try it if you understand that it involves an element of risk.

Materials

Light-colored fabric
Printer that uses pigment inks
Scissors
Card
Sticky tape

Directions


Fabric Printing Step1
Step 1: Choose a light-colored, flat fabric, and cut it to the maximum width that your printer can handle. I have an Epson R1800, so it can take just over A3+ width of fabric. If your printer supports printing from a roll, then you can make the fabric as long as you like. Otherwise you will need to cut the fabric into sheets. If you are using a long length of fabric, you might want to roll it onto a cardboard tube to make it more manageable.
Fabric Printing Step2

Step 2: Take a piece of card the same width as the fabric and fix the end of fabric to the card using sticky tape. The card works like a leader, giving the printer something to hold onto when you first start printing. I use a piece of card about 10" long, and tape the fabric about 2" in from the end. Once the card is through the printer, the weight will help keep the fabric running smoothly.

Step 3: Feed the card into the printer. On the Epson R1800, I use the roll feed to accept the paper, because the paper enters the printer at a more shallow angle and also because I can print unlimited lengths using the banner mode of the printer.
Fabric Printing Step4
Step 4: Create your design on the computer, and then print it out. Keep a constant eye on the printer while it is running, and watch that the fabric doesn't get creased or jam up the head. If you do have a problem, turn the printer off at the wall and clear the fabric manually before restoring power. Do not pull or move the fabric while it is still being printed. Slight changes in fabric tension can make your design distort, and increase the chance of creases forming.
Fabric Printing Step5

Step 5: You will need to fiddle around with the brightness / color settings on your printer to get the design looking right. Each fabric is slightly different, and experimentation is absolutely necessary if you want to get good results.

Step 6: When the printing is finished, you should leave your new custom fabric to dry for about an hour. You might find that some of the ink comes off on your hands when you first handle the fabric. This is normal, and is nothing to worry about. Simply rinse the fabric in warm water to remove any excess pigment, and then hang it out to dry
.
Fabric Printing End

Step 7: When the fabric is dry, iron the reverse side at low temperature. From this point onwards, the fabric can be treated just like shop-bought fabric. I recommend using a cool wash and ironing on the reverse side where possible to help preserve the colors.

This tutorial came from the Craft Blog

About the Author: Andrew Lewis is a journalist, a maker, an ardent victophile, and the founder of the www.upcraft.it blog. He is currently studying for a PhD. in archaeometrics and 3D scanning at the University of Wolverhampton.

Saturday, April 28, 2012

Stretching Shoes - What a Great Idea!

This is so neat! I will have to try this! My shoe size is an 8W and it is difficult to find shoes that fit and are comfortable. So I saw this on the SoleFood Site and on Pinterest. The directions are easy, although I am not crazy about putting shoes in the freezer, and you have 2 methods. Take a look and try it - I will be trying it!


Check them out below.


Freezing Method: best for when full toe or heel needs stretching


What you’ll need:

  • Ziploc bag 
  • Water 
  • Freezer 
Instructions:
  • Fill the plastic bag about a third to half way full. 
  • Let out as much air as possible from the bag. 
  • Insert plastic bag of water into problem area of shoe. 
  • Freeze the shoe overnight. 
  • Let ice thaw for about 20 minutes before removing from shoe. 
Try on and repeat if necessary.  Enjoy your beautiful, comfy shoes!


Heating Method: best for a quick stretch on leather

What you’ll need:

  • Thick socks 
  • Hair dryer
  • Leather conditioner 
Instructions:
  • Put on the shoes while wearing thick socks (this will be a tight fit). 
  • Heat the problem area of the shoe with your hairdryer. 
  • Flex your feet for 30 seconds while heating. 
  • Remove heat from shoes, but continue wearing until they’ve cooled. 
  • Try on and repeat if necessary. 
  • Apply leather conditioner to shoes to replenish the depleted moisture from the heat.

Tuesday, April 24, 2012

I have been busy.....

Hi! I have been busy doing some of the projects that I previously posted. I made another chalkboard placemat for one of my granddaughters. The colors are brighter and it shows up better. The black chalk fabric had to be primed first and that is why it looks hazy. Priming consists of rubbing chalk on it. Here is the link for directions: We All Sew .


The next thing that I did was finally sew a zippered bag. I have always been scared to death to sew zippers. I guess you could call me a zipperlockhead! I saw this on tutorial on Pinterest and finally tried it. The pinners said it was a good tutorial and was easy. It even has a lining! I need to do another one because this one was my first. It turned out OK but I learned a lot and thought of various modifications. Hope you like it. Here is the link for the tutorial  Zipper Lined Pouch Tutorial


The last thing that I tried was modifying the lemon bar recipe. I used strawberry pie filling instead of the lemon. The recipe is easy - 2 ingredients - angel food cake and pie filling. It is just so good!!! I haven't decided which one I like better. Future bars could be cherry, blueberry, and apple. Here is a link for the directions:2 Ingredient Lemon Bars


Thursday, April 12, 2012

Vintage Baby Quilt


Vintage Baby Quilt by YoYo Mama. 

I saw this easy baby quilt on the Ingrid Barlow Site and thought "Well, that's a great idea!". I am always looking for an easy way to do things. I also thought that maybe I could just put appliques on it. So many ideas - so little time! 

This is what Ingrid had to say: "You simply place your little squares on top of another piece of fabric + batting + backing, and you sew down the edges.  Throw it in the wash and poof!  There you have it.  This is a good one for all you wanna be quilters.  No piecing involved!".

Tuesday, April 03, 2012

FLORIANI HEAT N SHRINK AND FREE-MOTION QUILTING

\


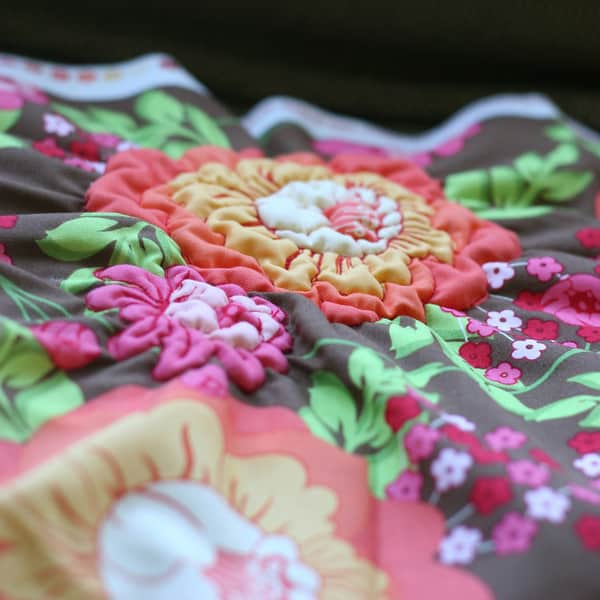
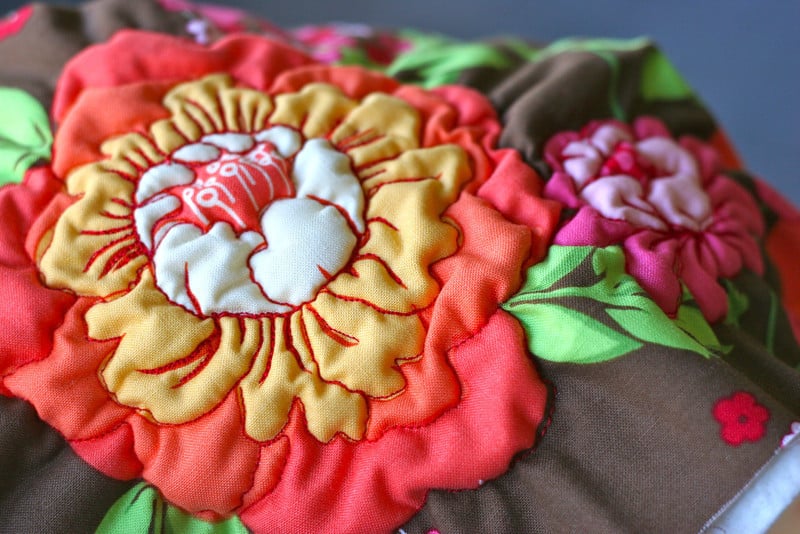
This is so neat! You take a fabric that has flowers or any shape that you want to make puffy. You will use Floriani Heat N Shrink with some batting and sew the lines of the flower. Then you you steam it and it puckers up! The uses are endless - applique on a wall hanging, quilt, purse, or you can do the entire piece of flowered fabric and use it to make a child's dress or nightgown.


The directions come from the Prudent Baby site  and they are very clear to understand. This should be easy to make.


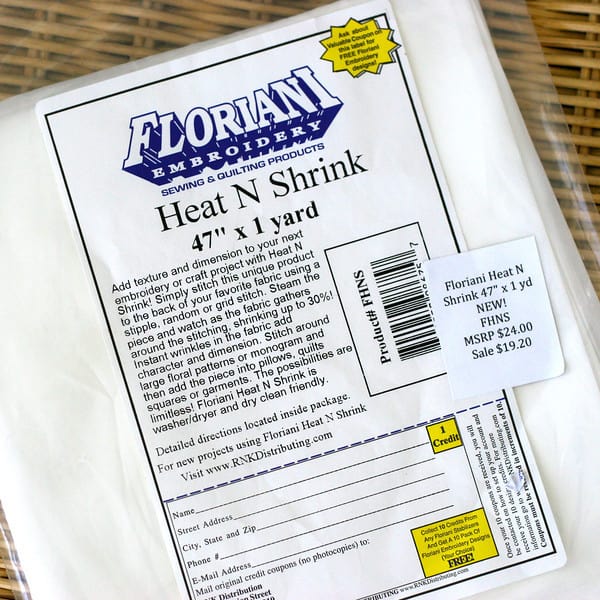
Above is the Heat N Shrink that was used and although a little pricey, it will last you for many designs. The site has additional pictures that you can see the difference in flowers that this method is used on and other flat flowers. 
Below is some of the directions that is on the site:
  • I cut a square the size of the large flower in my Sandi Henderson Fabric. Then I layered a square of low-loft batting in-between the Heat N Shrink and the back of the fabric, pinning in place.(The batting is optional but does add a nice puff to the petals.) 
  • Next I attached my quilting foot and lowered my feed dogs so I could try some free-motion quilting around the edge of the flower. Then just stitch along every line of the design. It takes a little practice, mostly you have to remember to move your fabric by hand. 
  • Since your fabric will be all bunchy later, it doesn’t have to be perfect. 
  • You can stitch lines, grids, dots or any design


Monday, April 02, 2012

Color Me Quilty: Painting Quilts

I just love this idea of painting quilts! This quilter used Lumiere paints by Jaquard to paint the quilt. She said that the quilt shimmered in the light.


Can you imagine the different ways that you can use the paints on quilts?

She used the paints without any mixing, applied by a small paint brush. They covered amazingly well.
Here is more detail:


And here is the link:  Color Me Quilty


Thursday, March 29, 2012

Ruffled Yellow Felt Pillow

I saw these just beautiful pillows on the Better Homes and Gardens site and just fell in love with them. I will have to make some of these! The colors in the picture seem so Springy but I am not sure that it will work with my furniture. Maybe I will try some different colors. The following sewing instructions are for one pillow. If you go to the Better Homes and Gardens link, the other pillow instructions are there.


Green and yellow pillows with ruffles and pleats.

Enlarge Image

Crafts Supplies:
  • Felt (yellow) 
  • 3/8-inch-wide velvet ribbon (green) 
  • Fiberfill 
Sewing Instructions:
  • Cut a strip of felt 9 inches wide and 18 inches long and hand-stitch two parallel lines close together through the center of the strip. Pull on the ends of each thread so felt strip gathers into a ruffle. 
  • Make a 6-inch-wide ruffle in the same manner. Machine-stitch the 6-inch ruffle in the middle of the larger ruffle. 
  • Cut two 12-inch squares from felt. 
  • Machine-stitch the double ruffle in the center of one square. 
  • Pin a piece of velvet ribbon in the center of the double ruffle. 
  • Place the squares right sides together and machine-stitch around edges, leaving a small opening along one edge for turning. Make sure you catch the ends of the velvet ribbon in the seams. 
  • Turn right side out and stuff with fiberfill. Hand-stitch the opening closed.

Monday, March 26, 2012

DIY: Chick & Bunny Treat Holders

I saw this tutorial and thought this would be 
so nice to do with children for Easter. They are so cute!
DIY: Chick & Bunny Treat Holders
This one’s for the kiddies… a fun little craft project + “friendly” holders for all those Easter Bunny treats!
PAPER BUNNY CUP Treat Holders
You’ll Need:
white paper cup
white cardstock
pink felt or pink cardstock
2 wiggle eyes
small pink pom-pom
medium white pom-pom (for tail)
white chenille stems
scissors, glue, glue dots or a stapler
Directions
• From the white cardstock, cut 2 large white ovals for the bunny ears. Trim one side of the oval off so it’s squared off at the bottom.
• Cut 2 smaller oval shapes from the pink felt (or paper) for the inner part of the ear. Glue the pink ovals in the center of the white ear shapes and set aside to dry.
• Cut white chenille craft stems into short pieces for the whiskers. Use craft glue or glue dots to attach the whiskers to the cup, then glue the pink pom pom on top for the nose.
• Attach the ears to the back rim of the cup with a stapler or glue dots.
• Glue the white pom pom to the back of the cup to create a cotton tail.
• Fill with a colorful Easter grass and candy treats!
*****
PAPER CHICK CUP Treat Holders
You’ll Need:
yellow paper cup
orange cardstock
orange chenille craft stems
2 wiggle eyes
yellow craft feathers
scissors, glue/glue dots, stapler or tape
Directions
• From the orange cardstock, cut a small triangle for the beak and glue it to the front of the cup.
• Glue the wiggle eyes above the beak.
• Cut six 3/4-inch pieces of orange chenille stem for the chick feet. Twist three pieces together at one end for each foot. Attach the feet to the front of the cup with glue dots or tacky craft glue.
• Staple or tape a few feathers to the back edge of the cup, making sure they peek out over the top.
• Fill with a colorful Easter grass and candy treats!
Here is the link to the blog that posted it. http://blog.hwtm.com/2009/04/diy-chick-bunny-treat-holders/

Thursday, March 22, 2012

Pattern: Firefly Jar LED Embroidery Pattern

zen_of_making_led_embroidery_pattern.png
This is an interesting addition to your embroidery projects! An LED light kit is used to enhance it. You can light it up! This is so cute!

Here is what you need:

Supplies:

* Firefly Jar embroidery pattern (download the PDF here)

* Embroidery floss in white, dark gray, dark green, medium green, light green, light blue, brown, and black

* Navy blue fabric

* Heavy-weight interfacing or t-shirt stabilizer

* LED Embroidery Kit from Sternlab.org (optional)


Tools:

* 5" embroidery hoop

* Embroidery needle

* Scissors

* Iron

* Ironing board

* Carbon/pattern transfer paper

* Tracing tool or pen

You can get the instructions at The Zen of Making with this link: http://www.thezenofmaking.com/2012/03/pattern-firefly-jar-led-embroidery.html

Tuesday, March 20, 2012

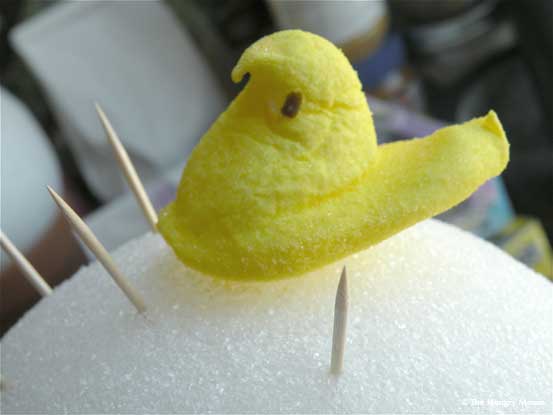
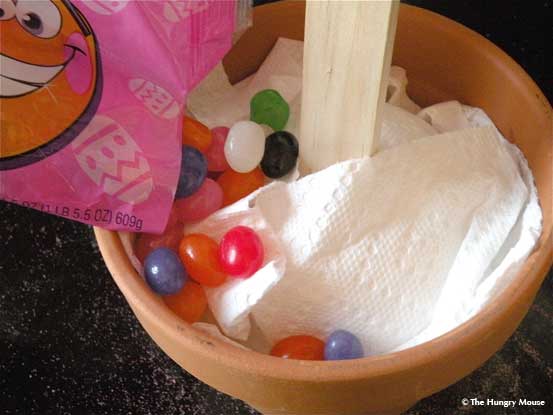
Peep Topiary


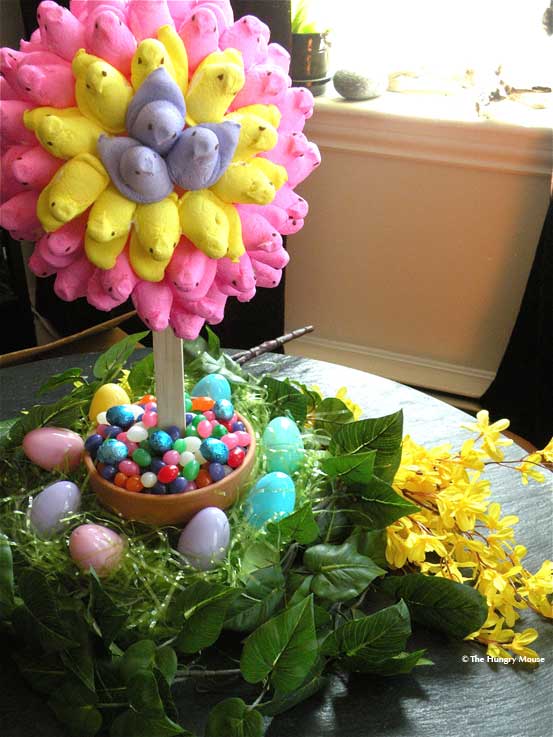
I saw this Peep Topiary on the Hungry Mouse Blog and just thought it was cute and easy! Here is what you need:

Peep Topiary

Peep topiary
1 6-inch pot
1 7-inch styrofoam ball (for topiary top)
1 4-5 inch styrofoam chunk (for inside the pot)
1 12-inch wooden stake or thick wooden dowel
1 box of wooden toothpicks
6-7 boxes of marshmallow Peeps
1 bag of jelly beans
Other table decorations
Assorted foil covered chocolate eggs
Plastic easter eggs
Easter grass
Assorted silk flower garlands
Makes 1 Peep topiary that will knock your socks off


Easter Egg Garland


Years ago, my step daughter made me a big egg and left part of it open so she could put in grass and Easter candies. It was so pretty and colorful! I just loved it! Here are some pictures that were on another blog and instructions how to make them. Hope you like them!

Make a stiffener mixture. I used 1 cup of liquid starch mixed with a half cup of flour. You could double or triple this recipe if you’d like.  I did.
 Next I got some string, I used embroidery floss. You could also use pearl cotton thread or crochet thread.
Then you stick your string in a bowl of starch goo, but don’t just plop it in there like I first did. Your string WILL get into a knot… and it’s not fun to try and un-snarl gooey string.  So don’t do it. Instead coil your string into the mixture and gently press it into the goo, I didn’t get one knot doing it this way. 
 
For a little egg, blow up a water balloon and wrap the gooey string around the balloon. Make sure you wipe off the excess goo and let it fall back into the bowl, it doesn’t need to be drippy.
One skein of embroidery floss was just enough for one water balloon sized egg.
It’ll take several hours for it to dry. Once it dries, pop the balloon. You might have crusty stuff in-between the string, I scraped that out with a straight pin. 
But then I decided to thread the eggs onto some more embroidery floss and made a garland out of them. You’ll need a fairly big needle to do this.
I threaded it  at about 1/4th of the way down from the top of the egg. To keep them in place, I hot glued the eggs to the string. Here is the link of the blog: http://www.craftyendeavor.com/2012/03/08/easter-egg-garland/

She also made some different size eggs.


Sunday, March 18, 2012

Fragrant Fruit Wreath - can you just smell it?

Turn dried oranges and lemons into a circle of refreshing color. Although this wreath has evergreen and Christmas balls in it, I would replace them with Easter eggs and pastel ribbons to make it for Easter.


What You'll Need 6-inch round florist's foam wreath 
  • 14 oranges 
  • 8 lemons 
  • Serrated knife 
  • Straight pins 
  • Evergreen sprigs or spring flowers
  • Three small holiday balls or plastic Easter eggs
  • Ribbon 
How to Make It


1. Cut oranges and lemons into 1/8-inch-thick slices. Places slices in a 150° F oven on an open rack to dry the slices. Leaves the slices in the oven for 3 hours, turning them over after 90 minutes. (Edges should not be brown.)


2. When fruit is dry but slightly moist, remove from oven and place on wire rack; air dry for 3 hours. If wreath form has flat edges, use a serrated knife to gently round.


3. Use straight pins to attach the fruit slices to the wreath, overlapping the pieces to cover the entire foam wreath.


4. Wire sprigs of greenery together, then secure the bundle to the wreath top. Wire a few holiday balls and ribbon to the greenery.

Here is the link: http://www.bhg.com/christmas/wreaths/fragrant-fruit-wreath/

DIY: SIMPLE & STUNNING LIVING SUCCULENT WREATH

This is such a great idea! It is a living wreath of plants. It is fairly easy and not that expensive. You can use supplies you already have around the house.

The tutorial has many pictures so rather than copying the entire tutorial, here is the link: http://prudentbaby.com/2010/12/prudent-home/diy-simple-stunning-living-succulent-wreath-2/

Thursday, March 15, 2012

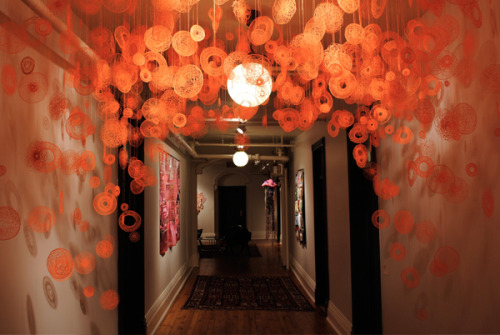
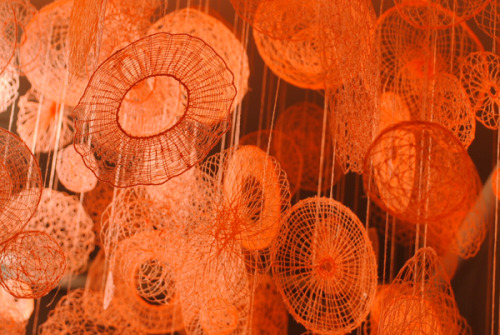
Drawing made out of thread by Amanda McCavour

Here is another drawing made from thread on fabric that disappears in water. This just amazes me! Amanda McCavour is definitely artistic! What do you think?


 farewell-kingdom:
Drawing made out of thread by Amanda McCavour

Amanda McCavour's Thread Drawings

I found this so interesting. Amanda McCavour makes these with her sewing machine, threads,  and fabrics that dissolves in water. Who would have thought? Anyway, these pictures represent her living room. Don't you just love these? I sure do!


amanda-mcavour-1.png
Amanda-McCavour-2.jpg
Amanda McCavour creates incredible images with thread. She describes how she does it on her website:
In my work, I use a sewing machine to create thread drawings and installations by sewing into a fabric that dissolves in water. This fabric makes it possible for me to build up the thread by sewing repeatedly into my drawn images so that when the fabric is dissolved, the image can hold together without a base. These thread images appear as though they would be easily unraveled and seemingly on the verge of falling apart, despite the works actual raveled strength.
The images above are from an installation called "Living Room," in which McCavour made life-sized drawings of all the stuff she once had in her living room.